Wiiiiiicked MIDI is the second Wiiiiiicked plug-in. Installation is explained in the installation guide.
Wiiiiiicked MIDI plays your synths and drum machines with your hands: on the trackpad, with the mouse or in front of the camera. It has no sound of its own: it sends MIDI to Live's other tracks. You choose a key, a scale and a style; the pad does the rest. Depending on the setting, it plays chords, a bass line, a melody or drums, live or in sequences locked to Live. It can also modulate your machines' sound through their CCs, the way Wiiiiiicked Audio modulates its effects.
The screen is in French. This manual keeps every on-screen word as you'll see it, and gives its meaning in italics the first time it appears in each part, like this: FIGER (freeze).
The interface at a glance
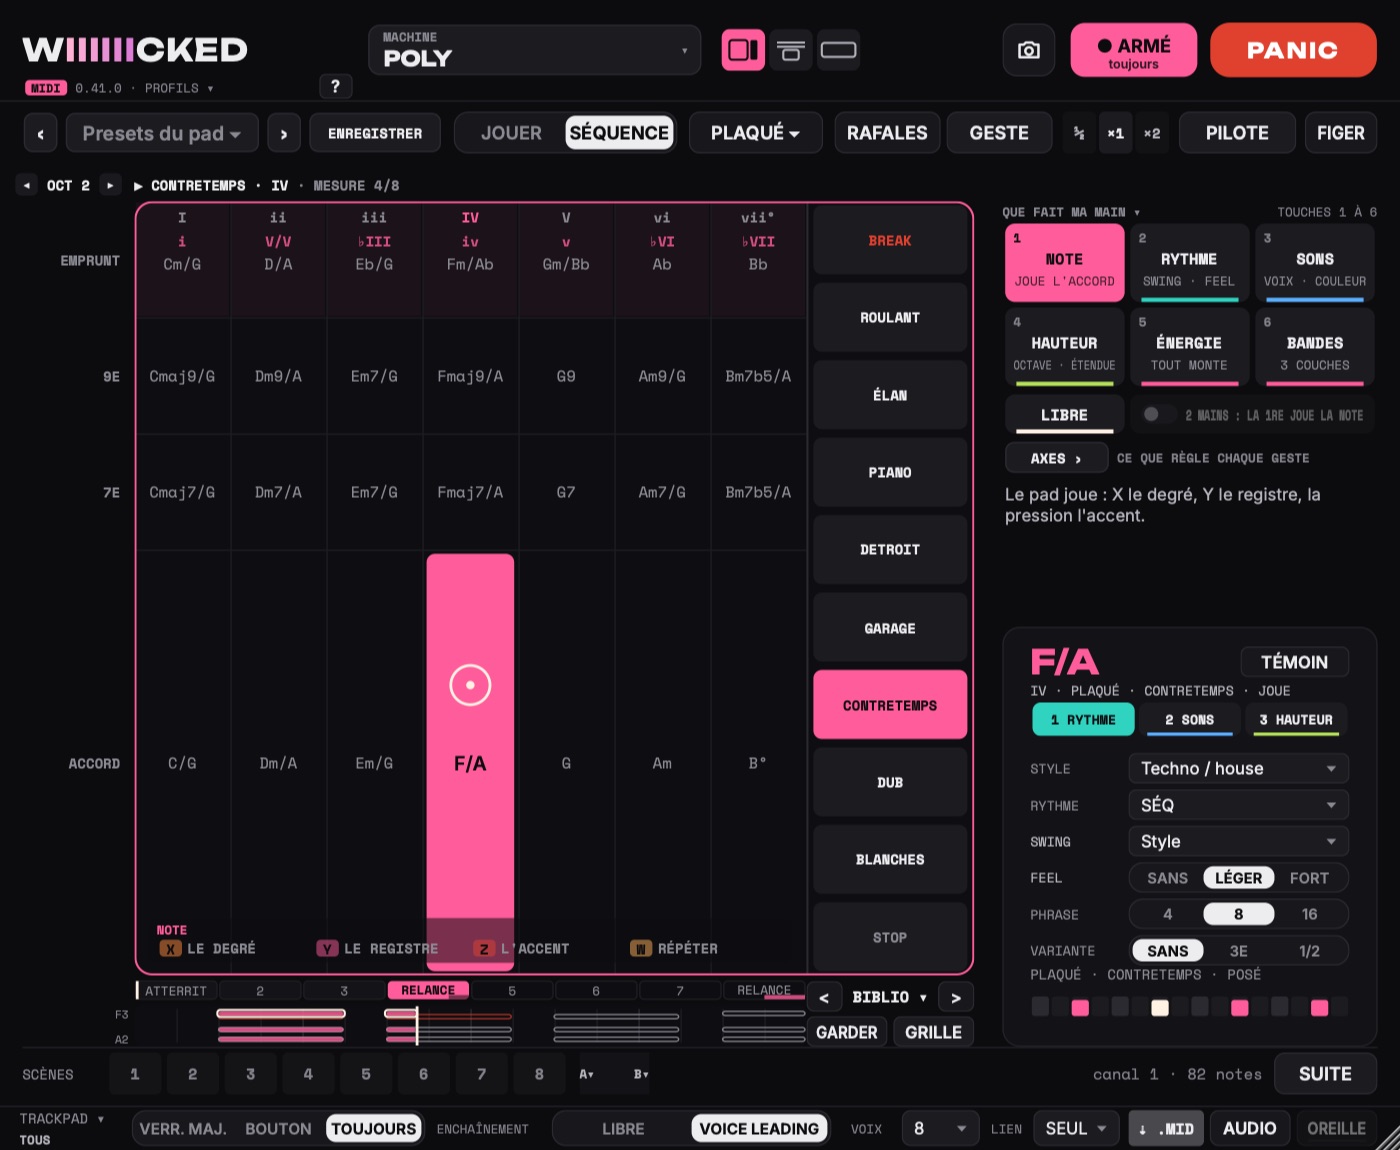
Click the numbers to tour the screen.Tap a number in the list to see it on the image.
- 1 The logo; below it, PROFILS ▾ (profiles: the profiles, the window size, help, ANNULER) and the ? for the gestures you can't see.
- 2 My machine: the MACHINE ▾ card, Batterie (drums), Mono or Poly, and its CCs (none, with the notes, on their own).
- 3 The three views: JEU (play), ÉDITION (edit: the preparation settings), SCÈNE (scene: the pad full size).
- 4 The camera: once on, it plays.
- 5 ARMER (arm): the trackpad plays (Caps Lock, a click, or always).
- 6 PANIC cuts every note.
- 7 How I play: the pad presets, then ENREGISTRER (save).
- 8 JOUER (play) or SÉQUENCE (sequence), and how the chords are played: PLAQUÉ ▾ (block chords), STRUM or ARPÈGE (arpeggio) (the line, in mono).
- 9 RAFALES (bursts) and GESTE (gesture) in Séquence; HOLD in Jouer.
- 10 ½ ×1 ×2, PILOTE (autopilot), which chains the chords by itself, and FIGER (freeze).
- 11 ◂ OCT ▸ and the “what's playing” line: the sequence, the chord, the bar, what's running.
- 12 The pad: the seven degrees of the scale; going up, the chord, its 7th, its 9th, then the borrowed chords.
- 13 The axes bar: what each gesture does, always written at the foot of the pad.
- 14 The column: STOP, eight sequences from the calmest to the fullest, BREAK.
- 15 The bar as it sounds, and the phrase that picks up again.
- 16 The column's pages, GARDER (keep) and GRILLE (grid).
- 17 What my hand does: six modes as tiles (keys 1 to 6), LIBRE (free), 2 MAINS (2 hands), AXES ›, and a sentence about the chosen mode.
- 18 What's playing, TÉMOIN (test sound) to hear it without plugging anything in, and the three layers: RYTHME (rhythm), SONS (sounds), HAUTEUR (pitch).
- 19 The eight scenes and the A ↔ B fader, under the pad.
- 20 The “canal 1 · n notes” counter (channel 1 · n notes) and SUITE (next), which chains the scenes.
- 21 The preparation: the trackpad, chord linking, the voices, the LIEN (link), .MID, AUDIO, OREILLE (ear).
The window reads from top to bottom, in three sentences: my machine, how I play, what my hand does. All three views keep this skeleton; they just add or take away setup controls.
-
At the top, my machine:
- the logo, with the MIDI line under it, its version number and PROFILS ▾ (profiles): one click opens the menu for profiles, window size, help and ANNULER (undo);
- the small ? at the end of that line: the gestures you can't see;
- the MACHINE ▾ card: what this instance controls (BATTERIE (drums), MONO or POLY) and its CCs (none, avec les notes (with the notes), or seuls (on their own)). One click opens it; in SCÈNE (scene), it can't be clicked (a stray click won't change the machine);
- three small drawings, JEU (play), ÉDITION (edit) and SCÈNE: the window's view (saved with the Set). The pad and the video are the same in all three;
- the Caméra (camera) icon;
- ○ ARMER (arm) (● ARMÉ (armed) when the trackpad is playing), with what arms it written underneath;
- PANIC, which cuts all the notes.
-
Below, the “how I play” bar, the same in all three views:
- ‹ the preset ▾ › and ENREGISTRER (save): the pad presets (section 8); in SCÈNE, ENREGISTRER goes away;
- JOUER · SÉQUENCE (play · sequence);
- in Séquence, the way it plays: PLAQUÉ ▾ (block chords) (or STRUM, ARPÈGE (arpeggio)) in poly, the line (BASSE ▾ (bass), ACID ▾…) in mono; its settings are in the 2 SONS (sounds) tab;
- HOLD in Jouer (the chord holds when you lift your finger), or in Séquence RAFALES (bursts) (each hit goes off in a burst) and GESTE (gesture) (your hand recorded, then replayed);
- on the right, in Séquence, ½ ×1 ×2 (half time, double time) and PILOTE (autopilot), which chains the chords by itself; then FIGER (freeze), which freezes what your hands have laid down.
- JEU (the starting view): a big pad. At the top right, QUE FAIT MA MAIN ▾ (what my hand does): the six pad modes as tiles (NOTE, RYTHME (rhythm), SONS, HAUTEUR (pitch), ÉNERGIE (energy), BANDES (bands), with their keys 1 to 6), then LIBRE (free) (the pad sculpts), the 2 MAINS (2 hands) switch (your 1st hand plays the note, the 2nd sets the layer), AXES › (axes) with the running modulations in purple, and a sentence that says what the chosen mode does. The title (or a right-click on the tiles) opens the mode options. Below, the panel with three tabs (RYTHME, SONS, HAUTEUR). What each gesture does is written on the pad, in the axes bar. The MES (“my” sequences) tools only show up there on the MES page.
- ÉDITION: JEU, plus two rows of setup above the pad (see below). Each setting appears there only once: the style, swing, feel, phrase, variation, length and pattern are in tabs 1 · 2 · 3, on the right.
- SCÈNE: the pad across the full width, for the stage, with the mode tiles in one row above it. At the bottom, instead of the setup settings: the 8 scenes, full size, the A ↔ B fader and SUITE (next). AXES and OCTAVE are closed.
- Under the pad, the scenes, in JEU and in ÉDITION, just like in Wiiiiiicked Audio: SCÈNES (scenes), the 8 slots, the A ↔ B fader (A ▾ and B ▾: its two scenes), the “canal 1 · n notes” (channel 1 · n notes) counter and SUITE.
- At the very bottom, the setup, kept small: TRACKPAD (VERR. MAJ. (caps lock) · BOUTON (button) · TOUJOURS (always)), ENCHAÎNEMENT (chord linking) (LIBRE · VOICE LEADING), VOIX (voices) (or NOTE for an A4 or Digitone track, RÉPONSE (response) in mono), LIEN (link) (SEUL (alone) · MÈNE (leads) · SUIT (follows): several instances playing together), then .MID (what you just played, to drag into Live), AUDIO and OREILLE (ear) (the link with Wiiiiiicked Audio).
The settings rows, in ÉDITION:
- First row: TONALITÉ (key), GAMME (scale), ACCORDS (chords) (3 SONS · 4 SONS (3 notes · 4 notes)), OCTAVE (1 to 4), VÉLOCITÉ (velocity).
- Second row: QUE FAIT MA MAIN, the mode tiles in one row (NOTE to BANDES, LIBRE, 2 MAINS, AXES ›), then CHANGEMENT D'ACCORD (chord change) (in Séquence; in Jouer, a gray line says it's waiting for Séquence). JOUER · SÉQUENCE and HOLD are in the “how I play” bar, as in JEU.
- The pad, in the center. In Jouer, it's whole; in Séquence, it has two zones: the chords on the left, the sequence column on the right. Under the column: its pages (<, >, and the page name, which opens their list), GARDER (keep) (in your favorites) and GRILLE (grid) (the chords you played, replayed by themselves). Under the chords, in Séquence: the bar as it sounds (section 6).
- Above the pad, the “what's playing” line, with ◂ OCT ▸ on the left: the slot (▶ when it's playing), the chord, the slot requested for the next bar, the bar, and what's running, in pink (PILOTE, GRILLE, GESTE, RAFALES, RÉPÈTE (repeating), MONTÉE (rise), LIEN, the camera, the muted elements). When space runs short, the bar goes first, then the requested slot: what's running stays.
- A small ▾ in the corner of a button means it has a right-click menu (GESTE, GRILLE, .MID, OREILLE).
- When nothing is playing, the pad tells you why, in the middle, one reason at a time: PAS ARMÉ (not armed) (Caps Lock or ARMER), AUTRE FENÊTRE (other window) (another Wiiiiiicked window has the trackpad: click here), FIGÉ (frozen), a layer mode that sets things without playing, MONTRE TA MAIN (show your hand) (camera), TOUCHE LE PAD POUR LANCER (touch the pad to start) (Séquence), or PANIC as long as your hand stays in the frame. With the camera, your hands turn gray when they're not playing.
-
The right-hand panel:
- at the top, in JEU, QUE FAIT MA MAIN: the mode tiles, LIBRE, 2 MAINS, AXES ›;
- the three-layer panel: at the top, what's playing (the chord, the note or the groove, and where it comes from) and TÉMOIN (test sound) (the plug-in plays a small sound itself, so you can hear without plugging anything in); below it, the tabs 1 RYTHME, 2 SONS, 3 HAUTEUR (section 9);
- on the MES page, your sequences: the PERSO (custom) menu, 1 MES · 2 MES (1 bar · 2 bars), ÉDITER (edit), REC, COPIER (copy), EFFACER (clear).
- With CC on their own, the patch panel takes the place of the layer panel, under the PATCH : … · ÉDITER › (patch: … · edit ›) button; the scenes stay under the pad. In ÉDITION, a CC settings page replaces the note rows (see section 12).
Tooltips appear when the mouse rests on a button for a moment.
1. In Live
Loading Wiiiiiicked MIDI
- Create a MIDI track and drag Plug-Ins › VST3 › Wiiiiiicked › Wiiiiiicked MIDI onto it.
- It only exists as a VST3: Live doesn't pass on the MIDI that comes out of an AU.
- It behaves like a silent instrument: its track makes no sound. The sound comes from the tracks it plays.
Playing a Live synth
On the synth's track (or the Drum Rack's):
- MIDI From = the Wiiiiiicked MIDI track;
- in the second menu, just below it: Wiiiiiicked MIDI;
- Monitor: In.
The tooltip on the “canal 1 · n notes” (channel 1 · n notes) counter (under the pad, to the right of the scenes) reminds you of this routing. Two tracks can listen to the same instance: they then play the same thing.
Playing a hardware machine
- On a MIDI track, add an External Instrument: MIDI To = your interface's output to the machine, and its channel.
- Set MIDI From and Monitor as above.
- For an Elektron drum machine, the channel is set in the External Instrument (see section 5 and section 19, “Your machines”).
One instance per machine
Live brings all of a track's MIDI down to channel 1: one instance can't play two machines at once. Use one instance per part: one for the chords, one for the bass, one for the drums… LIEN (link) makes them play together (section 13).
Hearing without routing: TÉMOIN (test sound)
TÉMOIN, at the top right of the panel, makes the plug-in itself play what it sends, with a small sound (a soft triangle for the notes, a little knock for the drums). It's handy for trying things out before any routing. It's off by default. Turn it off as soon as a synth receives the MIDI, or you'll hear both.
2. Playing
Click a cell.
Arming the trackpad
At the bottom left, TRACKPAD ▾ tells you which trackpad plays this window, and its three buttons tell you when it plays.
Which trackpad, just like in Wiiiiiicked Audio's Réglages (settings): a click on TRACKPAD ▾ offers Tous les trackpads (all trackpads) (the default; never the Magic Mouse, or else just holding it would play) or just one of those connected: the Mac's trackpad or the Magic Trackpad. The choice is written underneath (TOUS (all), DU MAC (the Mac's), MAGIC), in pink when the window has its own trackpad, and it's saved with the Set.
When it plays:
- VERR. MAJ. (caps lock) (the default): when the Caps Lock key is on;
- BOUTON (button): when ○ ARMER (arm) is clicked (it becomes ● ARMÉ (armed));
- TOUJOURS (always).
The mouse on the pad always plays, armed or not.
Only one window at a time. With Caps Lock, only the last Wiiiiiicked window opened or clicked plays on the trackpad, whether it's audio or MIDI. The others wait and show autre fenêtre (other window) under ARMER. To give the trackpad to another window, click in it. If the instance that had it disappears, the trackpad is freed after 2 seconds. In BOUTON or TOUJOURS, every instance follows the finger. The camera isn't affected (section 16).
A window with its own trackpad plays only that one, and doesn't fight anyone for it: with Caps Lock, it plays even if another window was clicked after it. For example, to play both plug-ins at the same time, one hand each:
- in Wiiiiiicked Audio's Réglages, Trackpad : le trackpad intégré seul (trackpad: built-in trackpad only);
- in Wiiiiiicked MIDI, TRACKPAD ▾ › Magic Trackpad seul (Magic Trackpad only);
- Caps Lock on: the Mac's trackpad plays the effects, the Magic Trackpad plays your synths.
A resting palm is ignored, just like in Wiiiiiicked Audio.
NOTES, CC or LES DEUX (both)
You choose them in the MACHINE ▾ card, at the top, under “SES CC” (its CCs):
- Sans CC (no CC): the pad plays notes (sections 3 to 11).
- Seuls (on their own) (CC): the pad modulates a synth's sound through its CCs, with no notes (section 12).
- Avec les notes (with the notes) (LES DEUX): the notes play, and pressure or a second finger modulates the sound.
BATTERIE (drums), MONO or POLY
In the same MACHINE ▾ card, under “CE QUE PILOTE CETTE INSTANCE” (what this instance controls):
- POLY: chords, for a polyphonic synth (Pro-800, MiniFreak, Analog Four…).
- MONO: one note at a time, for a bass or a lead (TD-3-MO, Sub 37, Kobol…).
- BATTERIE: twelve elements, for a Drum Rack, the Analog Rytm, or an Analog Four or Digitone track.
JOUER (play) or SÉQUENCE (sequence)
- JOUER: the pad directly plays what's under your finger. Lift your finger and everything stops (except with HOLD).
- SÉQUENCE: a sequence locked to Live runs, and the pad steers it. On the left, you choose the chord (a tap starts the sequence); on the right, in the column, you choose the sequence. Everything stays chosen when you lift your finger, until STOP.
Key, scale, chords
-
TONALITÉ (key): C to B. The names are written as in Live, with
#andb. - GAMME (scale): Majeur (major), Mineur (minor), Dorien (Dorian), Phrygien (Phrygian), Lydien (Lydian), Mixolydien (Mixolydian), Locrien (Locrian), Mineur harmonique (harmonic minor), Mineur mélodique (melodic minor). Nothing ever leaves the scale.
- ACCORDS (chords): 3 SONS (3 notes) for triads, or 4 SONS (4 notes) for seventh chords.
- OCTAVE: the octave of the tonic, in Live's numbering (C3 = middle C).
- VÉLOCITÉ (velocity): how hard the notes are played. At 100, the sequences keep their written accents.
Each column shows its degree (I, ii, iii…): under the pad in Jouer, at the top of the column in Séquence (the degree that's playing lights up). The cells give the chord, or the note in mono.
PANIC and HOLD
- PANIC instantly cuts all the notes that were sent. The pad plays again when your finger lifts; with the camera, when your hand leaves the frame, and the pad says so in big letters. It's also a Live parameter: you can map it to a button on your controller.
- HOLD keeps the chord or the note when you lift your finger, in Jouer. In Séquence, the sequence always holds, until STOP: HOLD's place is taken by RAFALES (bursts), which makes the hits go off in bursts, and GESTE (gesture), which replays your hand (section 7).
- Notes also stop by themselves when Live stops, when you deactivate the plug-in, or when Live pauses. Your finger then has to lift before it plays again; a hand in front of the camera, though, keeps playing (in Séquence, a new gesture or a raised thumb restarts the sequence).
3. Poly: chords
In JOUER (play)
- X chooses the degree: 7 columns, the chords of the scale.
-
Y depends on ENCHAÎNEMENT (chord linking) (at the bottom):
- VOICE LEADING (the default): the next chord moves as little as possible, and Y chooses the register (GRAVE (low), MÉDIUM (mid), AIGU (high), HAUT (top));
- LIBRE (free): Y chooses the inversion (FOND. (root position), 1ER (1st), 2E (2nd), 3E (3rd)), then the same ones an octave higher (+8).
- VOIX (voices) (2 to 8, at the bottom): how many notes your synth can play at once. The chord never goes over that: on 3 voices, a seventh chord loses its fifth; on 2, the third and the seventh are left.
- Notes shared by two chords stay held.
- A margin at the edge of the cells keeps the chord from flickering on a border.
- Each cell shows the chord you'll hear when you touch it, with its bass: in VOICE LEADING, from the chord that's sounding, F becomes F/C when it comes from C. You see what you're going to hear before you play.
- Pressure colors the held chord (trackpad, or a pinch in front of the camera): medium pressure adds the 9th (Cadd9), harder it becomes sus2, all the way it's sus4. Let go: the chord resolves. The sus4 falling back onto the third is the classic tension of pop and house.
At the top, the right-hand panel shows the chord name in big letters, its degree and where it comes from; its notes are on the small keyboard in the 3 HAUTEUR (pitch) tab: pale pink for the chord, bright pink for what's sounding.
The base octave, while you play
The base octave is the one the pad, the sequences and the small keyboard start from (1 to 4: C1 to C4, Live's numbers). You can change it in four ways, even while it's playing:
- ◂ OCT 2 ▸, at the top left of the pad, in all three views: the arrows go down or up an octave; a click on OCT opens the 3 HAUTEUR tab;
- the arrow keys on the computer keyboard: ↑ or → one octave higher, ↓ or ← one octave lower (when the plug-in window is in front, and no field is waiting for text);
- the small keyboard in the 3 HAUTEUR tab: click a key, and the pad starts from that key's octave; the line above the keys shows the octaves the pad reaches, and each C carries its name (C2, C3…);
- a hand or a finger: in the 3 HAUTEUR tab, a click on OCTAVE hands it to an axis (see below, “On camera”).
It's the same setting as OCTAVE at the top of the window in ÉDITION (edit), so it can also be controlled from Live. The small keyboard always follows it.
On camera, you set the base octave by hand. In the 3 HAUTEUR tab, click OCTAVE and choose Y, then turn on SCULPTER (sculpt) (the LIBRE tile: the pad sets things instead of playing): the height of your right hand chooses the octave (octave 1 at the bottom, octave 4 at the top), and it stays when your hand goes away (TIENT (holds), set by itself). The chords then come from your MIDI keyboard, from GRILLE (grid) (the ones you've kept) or from PILOTE (autopilot) (which chains them by itself), and your left hand still chooses the sequence. Without SCULPTER, your right hand plays the chords: hand OCTAVE to Z, your pinch, instead.
In SÉQUENCE (sequence)
- The left zone: 7 degrees across; going up, the chord (ACCORD), with its 7th (7E), with its 9th (9E), and at the very top EMPRUNT (borrowed chord). ACCORD takes up a bit more than the bottom half: a finger in the middle plays the chord itself, the 7th and the 9th are above it.
- EMPRUNT: chords borrowed from elsewhere, which lift the emotion. In major, those from minor: iv (Fm in C), ♭VI (Ab), ♭VII (Bb), ♭III (Eb), and II becomes major (V/V, D in C). In minor, those from major: IV and V as major chords (V with its leading tone), I as a major chord, and ♭II (the Neapolitan). Each cell shows its numeral (iv, ♭VI) above the name.
- Each cell shows the chord as you'll hear it when you go there, linked from the one that's sounding (C/E, Am7/G).
-
The way it plays (PLAQUÉ ▾ (block chords) in the “how I play” bar, or JEU (play) in the 2 SONS (sounds) tab):
- PLAQUÉ: the chord in rhythm, as one block;
- STRUM: the chord spread out, like on a guitar;
- ARPÈGE (arpeggio): one note after the other, over one to four octaves.
The arpeggio and the strum are set in the 2 SONS tab of the right-hand panel (JEU: PLAQUÉ, STRUM, ARPÈGE). Under the settings, the tab draws the bar as it plays (the sounding note lit up). On a setting, SÉQ (sequence) keeps what the sequence writes:
- ARPÈGE: SENS (direction) (↑ goes up, ↓ goes down, ↕ up and down, ? random, never the same note twice), OCTAVES (1 to 4), VITESSE (speed) (eighth note, triplet, sixteenth or thirty-second note, instead of the written rhythm), DURÉE (length);
- STRUM: VITESSE (from 4 to 90 ms between two strings; all the way to the left, the style's own), SENS (↓ always downward, ↑ upward, ↓↑ alternating; SÉQ: down on the beat, up on the “and”), DURÉE.
The ARPÈGE / STRUM screen (and LIGNE (line), in mono)
A click on the small bar in the 2 SONS tab (ÉCRAN ▸ (screen)) opens the arpeggio or strum screen full size, in place of the pad, like the ANNEAUX (rings) editor (section 7). At the top, PLAQUÉ · STRUM · ARPÈGE switches from one to another; ✕ FERMER (close) gives you the pad back. The sequence keeps playing; your MIDI keyboard, PILOTE or GRILLE choose the chords.
The arpeggio, its 16 notes drawn at their pitch (the playing note lit up, the accents thicker):
- the 16 steps, under the notes: one click silences a note, another brings it back; dragging along the steps turns them on or off in one gesture. Right-click: all steps, every other one, three out of four, invert;
- dragging in the bar: to the right, faster (eighth → thirty-second note); upward, more octaves (1 to 4);
- the settings below: SENS, OCTAVES, VITESSE, RÉPÉTER (repeat) (each note played 1 to 4 times), ACCENT (a strong note every 2, 3 or 4; SÉQ: the sequence's own), CHANCE (the chance that each note plays: at 70%, the arpeggio breathes), DURÉE.
The strum, each hit of the bar fanned out, one string per dot (the bigger the dot, the louder the string):
- a click on an arrow ↓ ↑ changes the direction;
- dragging in the bar: to the right, a slower strum; upward, more DÉCRESCENDO;
- the settings below: VITESSE, SENS, COURBE (curve) (to the right, the strings closer and closer together, like a flick of the wrist; to the left, slower and slower; in the middle, even), DÉCRESCENDO (each string softer than the one before), CORDES (strings) (the chord as it is, or 4, 5, 6 strings: the chord doubled at the octave, like a guitar), DURÉE.
The arpeggio and the strum also have their COULEUR (color). As in the tabs, a click on a setting's name hands it to X, Y, Z or W, or to a modulation (LFO, APPUI (pressure), VITESSE); the dot at the end of the name tells you who holds it. A setting that an axis or a modulation is moving shows its value in pink, and what's playing gets a cream outline. In SCULPTER, a cross shows where your hand is.
All these settings can also be driven by the axes (section 8): with SCULPTER, X sets the arpeggio's speed and Y its octaves (for the strum: its speed and length), with your finger or, on camera, with your right hand.
- Colors: in the “lively” sequences, the chord takes its 9th; in the fuller ones, passing notes join the arpeggios.
- Pressure (pressing hard, or Shift + click) goes up one or two notches: more color, more notes, louder.
- A chord change waits for the chosen timing (CHANGEMENT D'ACCORD (chord change), section 6). While it waits, “→ F AU TEMPS” (→ F on the beat) shows in pink.
ÉTENDUE (range): the sequence over several octaves
◂ OCT ▸, at the top left of the pad, is there in every mode (mono and poly, Jouer and Séquence, the engines and ANNEAUX included). A click on OCT opens the 3 HAUTEUR tab (in SCÈNE (scene), with no panel, its card):
- OCTAVE: ◂ ▸, the base octave, where the pad starts from;
- 1 OCT: the sequence as it's written;
- SAUTS (jumps) (over 2 or 3 octaves, ÉTENDUE): some notes jump one or two octaves, always on the same beats of the bar. That's how acid lines play;
- ESCALIER (staircase) (2 or 3 octaves): the phrase climbs one octave per step, then starts again at the bottom with the next phrase;
- HASARD (random): each hit draws its octave, with a new draw every bar. The four vertical bars (-1, BASE, +1, +2) are the chances: drag them up or down, and the percentage above tells you each one's share. The notes of one hit stay together (a chord doesn't scatter).
In Jouer, the pad's rows choose the octave; these ways of spreading out act on the sequences. A note that's held or slid keeps its octave to the end.
4. Mono: bass and melodies
In JOUER (play)
- X chooses the note of the scale; Y the octave (4 rows, OCT).
- Sliding your finger from one cell to another ties the notes: the new one starts before the old one ends, which makes a mono synth glide (the TD-3's slide).
- Finger lifted, then put back down: a new attack.
- Pressing hard or Shift + click: an accent at 127.
In SÉQUENCE (sequence)
The left zone chooses the root (7 degrees) and the octave (below, its own, above). The line (BASSE ▾ (bass) in the “how I play” bar, or LIGNE (line) in the 2 SONS (sounds) tab):
- BASSE: the root in rhythm, written for each style;
- OCTAVES: the root and its octave;
- WALKING: one note per beat, walking toward the next root;
- ACID: 303 lines, with slides and accents;
- MÉLODIE (melody): a loop of scale notes that changes little by little (see below).
The bass prepares the chord changes: it plays an approach note just before the new chord.
The LIGNE screen: a click on the small bar in the 2 SONS tab (ÉCRAN ▸ (screen)) opens the line full size on the pad, as it sounds. At the top, BASSE · OCTAVES · WALKING · ACID · MÉLODIE; dragging in the bar sets the SLIDES (to the right) and the ACCENTS (upward), with the middle keeping the line's own. Below: SLIDES, ACCENTS, DURÉE (length), MUTATION, ÉVOLUTION (evolution) and BOUCLE (loop), each of which you can hand to an axis or a modulation with a click on its name.
MÉLODIE and ÉVOLUTION
- A loop of 2 to 16 notes from the scale, read one note per hit of the rhythm chosen in the column (from “Lente” (slow) to “Glisse” (glide)). Its length is set in the 2 SONS tab (BOUCLE, “8 notes” for example).
- ÉVOLUTION (2 SONS tab): the chance that a note of the loop changes when it plays. At 0%, the melody is locked and goes round in a loop; at 100%, every note is new. By default, 25%: a note changes now and then, and below 75% never more than one per round of the loop, so you can recognize the melody. (The MUTATION in the 3 HAUTEUR (pitch) tab adds to it.)
- Pressing hard on the pad adds mutation, for as long as you press.
- On the beat, a changed note is a chord note; between the beats, it's a step or two from the previous one.
- The loop is shown in the panel, with the playing note lit up. It comes back with the Set.
- MÉLODIE plays in Séquence; in Jouer, the pad plays the note under your finger.
The TD-3-MO
It slides when two notes overlap, and accents when the velocity goes over a threshold. Set this threshold to around 110 in SynthTribe. Otherwise, every note is accented, or none. The 2 SONS tab reminds you.
5. Drums
KIT and ÉLÉMENT (element)
-
KIT (2 SONS (sounds) tab, like ÉLÉMENT): the notes sent.
- Drum Rack: the notes of Live's kits (C1 kick, D1 snare, F#1 closed hi-hat, A#1 open hi-hat…).
- Analog Rytm: notes 0 to 11 (C-2 to B-2 in Live) trigger its tracks 1 to 12. In the External Instrument, try the Rytm's auto channel, otherwise channel 1.
- A4 / Digitone: one track of the machine, so a single note. You choose it in NOTE, at the bottom (C3 by default). The track's channel is set in the External Instrument.
- ÉLÉMENT: Tous (all), or just one (Grosse caisse (kick), Caisse claire (snare), Rimshot, Clap, Tom basse (floor tom), Tom grave (low tom), Tom médium (mid tom), Tom aigu (high tom), Charley fermé (closed hi-hat), Charley ouvert (open hi-hat), Cymbale (cymbal), Cloche (bell)). A single element is for an A4 or Digitone track, or for one Live track per element. With A4 / Digitone and no element chosen, it's the kick.
In JOUER (play): twelve zones
- At the bottom: kick, snare, clap, rimshot; in the middle: closed and open hi-hats, cymbal, bell; at the top: the toms.
- A tap plays the element. Finger held down: a sixteenth-note roll, locked to Live.
- Sliding to another zone plays that one in turn.
- Pressing hard or Shift + click: 127.
In SÉQUENCE (sequence): grooves and density
- The column offers 8 grooves of the style, from the calmest to the fullest.
- The left zone sets the DENSITÉ (density) with X: from the strong hits only (on the left) all the way to the ghost notes (on the right). At the bottom of the zone, the groove in miniature: the lit hits play at this density, the outlined ones come in further to the right.
- COUPER (mute), to the left of the pad: the twelve elements, from the hi-hats (at the top) to the kick (at the bottom). One click mutes the element, another brings it back, on the next beat (dotted, it's waiting for the beat). Use it to pull the kick out before a drop and bring it back right on the 1. It's saved with the Set, and also works on the engines (section 7).
- Grids-style: above the line drawn on the pad (“↑ MÉLANGE AVEC LE GROOVE SUIVANT” (blend with the next groove)), the groove blends with the next one in the column, element by element. At the very top, it's the whole next one. Below the line, nothing changes.
- The drums play their own fills: a fill on the last beat of every 4th bar, longer at the end of a phrase. When the phrase lands, a cymbal. In Techno / house and in Acid, they fill like a machine, only at the end of the phrase: the kick drops out on the last beat (techno), a clap and an open hi-hat. BREAK, for its part, keeps its snare roll.
- CHANGEMENT D'ACCORD (chord change) and DURÉE DES NOTES (note length) don't apply to drums: they stay grayed out.
6. The sequences in detail
The column
In Séquence (sequence), the pad's right-hand column has, from bottom to top: STOP, the page's 8 sequences, BREAK.
- A tap on a sequence plays it at the next bar. The 8 sequences go from the calmest to the fullest. A fresh instance starts on the 3rd, where the groove begins.
- STOP stops the sequence. Touching a chord starts it again.
- On the trackpad, you can keep one finger in each zone: one on the chords, the other on the column. A chord finger slid into the column moves over to it.
- Without Live playing, the sequence starts from your finger, on its own clock. When Live starts, jumps or loops, the sequence gets back in place on Live's bars.
Under the pad: the phrase, and the bar as it sounds
The phrase line, just under the pad: one cell per bar of the phrase (4, 8 or 16), with the playing one lit up. A click on a bar launches a MONTÉE (rise) there, a build-up (the drop lands on its 1); a right-click sets the length of the MONTÉE you get by holding BREAK. The line shows what's coming before it happens:
- RELANCE (fill): the bar that plays the fill, with a line at the bottom right, as long as the fill (the last beat, the last two, or the whole bar);
- ATTERRIT (lands): the start of a phrase of 8 or 16, with its crash (a cream line on the left);
- MONTÉE in red on the bars it takes up, then DROP on the bar where everything comes back down;
- → a slot's name: the one you asked for, on the bar where it will start;
- with GRILLE (grid) replaying (mono and poly), the chord of each bar (I, IV, vi…): you see the chords coming.
A calm sequence (the two bottom slots of the column) doesn't play fills and doesn't land: the line then shows neither.
The bar as it sounds, below it, shows what really comes out of the plug-in, bar by bar, over its 16 sixteenth notes. It's not the written sequence: it's the result, with everything that changes it as you play (your hand, the density, the pressure, the dice, the mutating loop, the end-of-phrase fills, BREAK, RAFALES (bursts), RÉPÉTER (repeat), the MONTÉE). A white line moves along with playback.
- For drums, four lines: the hi-hats and cymbals (HH), the snare, clap and rimshot (SD), the toms (TOM), the kick (BD).
- In mono and poly, the notes at their pitch, with the lowest and the highest named on the left; a held note is a long line.
- Solid: what played in the bar. The brighter it is, the louder.
- Outline: the bar before. Ahead of the playback line, it's what came last time; behind it, an outline left empty (in red) is a note that has gone.
- Cream edge: a note that wasn't there in the bar before.
So at a glance, you see what your gesture or a setting has just changed. While nothing is playing, the strip reminds you how to read it. With the camera (section 16), it's thinner, above the gesture reminder.
The pages: MES (“my” sequences), FAVORIS (favorites), BIBLIO (library) and its versions
Under the column, < and > turn the pages: GRAVITÉ (gravity), TURING (Turing machine), DÉS (dice), EUCLIDE (Euclid), MES, FAVORIS, BIBLIO, then the BIBLIO versions. A click on the page name (“BIBLIO ▾”) shows them all, the engines first:
- EUCLIDE (hits spread out as evenly as possible, with its ANNEAUX (rings) to set by hand), DÉS (a dose of chance), TURING (a loop that mutates), GRAVITÉ (a bouncing ball): the engines, sequences that are born as they play (section 7);
- MES: your 8 sequences (PERSO (custom) 1 to 8, section 11);
- FAVORIS: the ones you've kept;
- BIBLIO: the library, written by hand for each style and each pattern;
- VERSION 1 to VERSION 64: the library sequence written differently, in two to four other ways, in the spirit of the pattern. The same number always gives the same version.
One word per idea: a VERSION is another way of writing the library; the VARIANTE (variation) is the sequence said differently once, on the 3rd bar; the DÉS are chance.
A page chosen from the list plays right away: at the next bar if something is playing, on the slot with the same number (or the one you had chosen there). No need to tap a slot first. The < and > arrows only show: what's playing carries on as long as you don't tap a slot on the new page. When nothing is playing, your first touch starts the page on display.
On the trackpad: put a finger on the column and slide it sideways. To the right, the next page; to the left, the previous one; one page per touch.
GARDER (keep)
GARDER, under the column, stores the playing sequence in your FAVORIS (eight per style and per pattern, saved with the Set). The button becomes GARDÉE (kept); a second click removes it.
The third row
These settings are no longer in a row: PHRASE, FEEL, VARIANTE and SWING are in the 1 RYTHME (rhythm) tab, DURÉE (length) in the 2 SONS (sounds) tab, and CHANGEMENT D'ACCORD (chord change) at the end of the second row (ÉDITION (edit)).
- PHRASE (MESURES) (phrase, in bars): 4, 8 (the default) or 16 bars. The 3rd bar of every 4 can vary, the 4th plays a fill: a drum fill on the last beat, the bass climbing toward the root, a suspended chord in the lively sequences. At the end of 8, the fill is stronger; at the end of 16, the fill lasts the whole bar. On arrival (the 1st bar, and the 9th out of 16): a cymbal, and the bass an octave lower.
- CHANGEMENT D'ACCORD: DIRECT (on the sixteenth note), TEMPS (beat) (on the next beat, the default) or MESURE (bar). Your finger can move early: the chord waits for its spot, the bass plays an approach note, and the block chords anticipate it by an eighth note.
- FEEL: SANS (none), LÉGER (light) (the default) or FORT (strong). The style's human feel: the late snare of hip-hop, the early hi-hats of techno, small differences in how hard things are played. It's the same on every pass.
- DURÉE DES NOTES (note length): COURTE (short) (staccato), NORMALE (the default: three quarters of the way to the next note) or LIÉE (tied) (all the way to the next one).
- VARIANTE: SANS, 3E (the 3rd bar of every 4) or 1 / 2 (every other bar). The sequence is said differently once: a moved hit, an accent, a figure on the last beat. Always the same one. On the engines, it's grayed out: they already change by themselves.
- You can follow the phrase on its line, under the pad (see above): the playing bar, the fills, the arrival.
SWING: Style (the style's own), Droit (straight), Léger, Moyen (medium) or Fort.
The break
The break starts on the very next sixteenth note and always ends on a beat: the style's fill on its own, the chords climbing, the bass rising, with their last hits, the loudest ones. If there are fewer than two sixteenth notes left before the beat, it takes the beat after that, but it never crosses the bar line: the next 1 keeps its kick and its cymbal. Four ways to launch it:
- the BREAK slot in the column;
- on the trackpad, a tap with a second finger;
- a right-click on the pad;
- Live's Break parameter (to map to your controller).
Keep your finger on BREAK: that's a MONTÉE (section 7).
GRILLE: the chords that play by themselves
GRILLE shares GARDER's spot, in Séquence (not with drums).
- One click: from the next bar on, the grid keeps the chords you play during one phrase (4, 8 or 16 bars). The button shows “REC À LA MESURE” (REC at the bar), then “REC 35 %”.
- At the end of the phrase, it replays those chords by itself, on a loop (“GRILLE ▶”). Your hands are free for Wiiiiiicked Audio, or for another instance.
- Touching a chord takes back control: the grid stops. A click on GRILLE stops it too.
- Right-click: “Rejouer la grille gardée” (replay the kept grid) (from the next bar on), “En garder une nouvelle” (keep a new one), “Effacer la grille” (clear the grid).
- It's saved with the Set.
7. The sequences live
The engines: four more pages, and the rings
To the left of MES (“my” sequences), there are four pages whose sequences aren't written in advance: EUCLIDE (Euclid) spreads the hits out as evenly as possible, DÉS (dice) adds a dose of chance, TURING (Turing machine) makes a loop mutate, GRAVITÉ (gravity) bounces a ball; and EUCLIDE's ANNEAUX (rings) are set by hand. They're built bar after bar. Always 8 slots, always locked to Live and in the scale, with the style's phrase, feel and swing. The simplest way to get there: a click on the page name, under the column; the chosen engine plays right away.
Each engine has its own panel, in the 1 RYTHME (rhythm) tab:
- its name, the playing slot (“JEU : TRESILLO · JOUE” (play: TRESILLO · plays));
- what it does, in one sentence;
- what it plays, drawn while it plays: EUCLIDE's rings, the DÉS draw, TURING's loop, GRAVITÉ's ball;
- its settings, below.
With drums, the pad sets two of these settings by hand: X and Y. A small X or Y next to the setting tells you so. When you lift your finger, the value stays, and the panel's slider takes it on (Live can record it as automation). After that, the slider can also be set with the mouse: the last hand to move wins.
In mono and poly, the pad plays the chords, as on the other pages: the engine is set in the panel, and pressing hard pushes its settings (more hits, more chance, a ball dropped from higher up).
Settings that don't apply are grayed out. VARIANTE (variation) is grayed out on every engine. On GRAVITÉ, the ball falls and bounces by itself, off the grid: STYLE, SWING, FEEL, DURÉE DES NOTES (note length) and the mono LIGNE (line) are grayed out there too. Everything else counts everywhere: key, scale, octave, velocity, kit, element, phrase, chord change, RAFALES (bursts), GESTE (gesture).
-
EUCLIDE: rings of hits spread out as evenly as possible. Rhythms from all over the world are made this way: the tresillo (3 in 8), the bossa, the cinquillo, the bembé. The panel draws the rings, one per drum element, and the playing step.
- COUPS (hits) (X with drums): how many hits each ring spreads out. In the middle, the pattern's own; in poly and mono, pressing hard adds two.
- ROTATION (Y with drums): the hits turn around the ring. The rhythm keeps its shape but lands somewhere else; the kick stays the anchor.
- POLYMÈTRE (polymeter): some rings have 5, 7, 12 or 13 steps and turn against the bar. The figure keeps renewing itself, then everything lands back on the 1 every 4 bars.
- In mono, the notes rotate over the chord. In ACID, a second ring places the accents (about one hit in three) and turns one step every bar: the line moves by itself; a note without an accent slides into the one after it.
-
DÉS: the style's sequence, with a dose of chance. The skeleton doesn't move (the 1, the accents); around it, each step tries its luck, and chance only adds hits that the style plays elsewhere. The panel shows what's written, what the dice added and what they removed; behind it, in gray, what the style plays on each step.
- CHAOS (Y with drums): from the written sequence (0) to a sequence that runs wild. Pressing hard adds more. Past halfway, the hi-hats also go off in bursts (2 or 3 hits in one sixteenth note).
- TIRAGE (draw): a new draw every bar (1 MES (1 bar)), every 2 or 4 bars, or EN BOUCLE (on a loop): the same draw comes back.
- RELANCER LES DÉS (roll the dice again): another draw, right now. The panel draws it straight away and numbers the draws (“TIRAGE 3”). Tapping the playing slot again does the same. In 1 MES, the dice already change every bar: you mostly hear RELANCER (roll again) in 2, 4 or EN BOUCLE.
-
TURING: a loop that mutates as it plays. The panel shows the loop, and, highlighted, what has just mutated.
- ALÉA (randomness) (Y with drums): the chance that it changes every bar; at 0, it freezes. Pressing hard makes it mutate, for as long as you press.
- LONGUEUR (length): the loop is the whole bar (1 MES), half of it (1/2) or its first beat (1/4), replayed to the end of the bar.
- RECOMMENCER LA BOUCLE (restart the loop): it starts again from the written sequence. Tapping the playing slot again does the same.
- The loop is saved with the Set: when you reopen the Set, the slot picks up the loop just as it was, and it keeps mutating from there.
-
GRAVITÉ: a ball dropped onto the bar, hits closer and closer together. Toms tumbling down, a rolling snare, a falling arpeggio. The panel draws the bounces and the falling ball. The last two slots (RETOUR (return), ASPIRE (pulls in)) play backwards: the hits spread apart, the loudest one right before the next fall.
- HAUTEUR (height) (Y with drums): from higher up, the ball bounces longer. In poly and mono, pressing hard drops it from higher up.
- REBOND (bounce) (X with drums): a dead ball (few bounces) or a lively one (lots of them, tighter and tighter).
- Let go of the pad, the ball drops: when your finger (or your hand, on camera) lifts, a ball drops right away, on the next sixteenth note, and the falls start again from there.
- ANNEAUX: EUCLIDE's rings, set by hand (just below). The À LA MAIN › (by hand) button, in EUCLIDE's panel, takes you there and opens the editor.
Keep what you hear: on an engine, GARDER (keep) becomes → PERSO 1 (the PERSO (custom) chosen at the bottom of the panel). A click copies the playing bar into your sequences (MES), just as it sounded. COPIER (copy) does the same.
ANNEAUX: your rings, by hand
The ANNEAUX page (from EUCLIDE: À LA MAIN ›) is a Euclidean sequencer you set yourself, on the same principle as the one in Elektron machines. Its 8 slots (JEU 1 to 8) are 8 complete patterns, saved with the Set; a tap switches to another one at the next bar, like the other pages. The 8 starting patterns show what the settings do: four on the floor, tresillo, five against four, bembé…
A pattern has tracks: with drums, one per element (kick, snare, hi-hats…), so a whole drum kit; in poly and mono, just one.
Each track has three rings. Each ring has:
- its LONGUEUR (PAS (steps)), from 1 to 32 sixteenth notes. 16 makes one bar; 7 or 12 turn against the bar and against the other rings (a ring of 16 and a ring of 12 only land together every 3 bars); 32 makes two bars;
- its COUPS, spread as evenly as possible over its steps; at 0, it goes silent;
- its ROTATION, which turns its hits around;
- in mono and poly, its OCTAVE (-2 to +2): the hits of ring 3 can play an octave higher. Where several land together, the first one's octave wins.
Ring 2 joins ring 1, and ring 3 joins what the first two do, through a junction:
- OU (or): the hits of both; where they land together, an accent;
- UN SEUL (only one): one or the other, not both;
- ET (and): only where both land;
- SAUF (except): the first minus the second (16 hits SAUF 4: everything except the beats).
And the track has its own ROTATION (everything it plays turns, its rings together), its PAS (1/16, sixteenth notes, or 1/8, eighth notes: the track twice as slow, 16 steps make two bars) and, with drums, a NIVEAU (level): how hard the hits are.
ÉDITER LES ANNEAUX (edit the rings), in the panel, opens the editor in place of the pad, laid out ring by ring:
- on the left, the tracks, with the playing bar; a click picks one, a click on its dot turns it on or off;
- in the middle, the chosen track: ring 1 on the outside (pink), ring 2 (cream), ring 3 (purple), each with its steps, and inside, what's playing this bar; above, the summary (“4/16 OU 3/16 OU 5/12”);
- on the right, the track: its ROTATION, its NIVEAU, PAS 1/16 · PAS 1/8, PISTE ALLUMÉE (track on), PARTIR D'EUCLIDE (start from EUCLIDE), FERMER (close);
- at the bottom, one card per ring, in its color: PAS, COUPS, ROTATION, OCTAVE, and for rings 2 and 3, their junction next to their name.
EUCLIDE and ANNEAUX are the same thing. EUCLIDE is ready-made rings: one ring per voice, which you set while playing with COUPS and ROTATION (and POLYMÈTRE). ANNEAUX is the same rings, set by hand, up to three per track. PARTIR D'EUCLIDE copies into the open slot the rings EUCLIDE is playing right now (its slot, its COUPS, its ROTATION; its eighth-note lines, like the tresillo, arrive as PAS 1/8), so you can touch them up: they sound the same, then you add a second or third ring, change a length…
You hear everything from the next bar, and ANNULER (undo) (⌘Z) undoes a setting. FERMER gives you the pad back.
½ and ×2: half time, double time
In the “how I play” bar, next to PILOTE (autopilot), ½ ×1 ×2:
- ½: the sequence twice as slow, the breathing space of a break;
- ×2: twice as fast, the urgency before the drop.
Live's tempo doesn't move. The change waits for a bar line that Live and the sequence share (dotted while it waits), so the bars stay locked. The line above the pad shows ½ TEMPS (half time) or ×2 TEMPS (double time). Each scene keeps its own.
RAFALES
In Séquence (sequence), RAFALES takes HOLD's place. When it's on, press hard (or Shift + click): each hit goes off 2, 3 or 4 times, depending on the pressure, softer and softer. Hi-hat bursts, 303 rolls, stuttering chords. While it's on, pressure no longer colors the chords.
RÉPÉTER (repeat)
- Keep a second finger down on the pad (for a quarter of a second): the last bit loops, from the next sixteenth note. The height of your finger chooses the length: 1/4 at the bottom, then 1/8, 1/16, 1/32 at the top. At 1/4 and 1/8, what just played comes back; at 1/16 and 1/32, the last hit stutters.
- Let go: the music picks up where it would be by now, not where you stopped it.
- With the mouse: hold the right-click on the pad (a short right-click is still a BREAK).
- Live's Répéter parameter (and Répéter : durée (repeat: length)) does the same from your controller.
- With LIEN (link), all the instances repeat together.
With LES DEUX (both), the second finger modulates the CCs: it doesn't repeat. The held right-click and the parameter still do.
MONTÉE (rise) and drop
Keep your finger on BREAK (for half a second), or use Live's Montée parameter. From the next beat, and to the end of the current 4 bars (one bar at least), or over 1, 2 or 4 bars (right-click on the phrase line, under the pad):
- the drums fill up and the snare speeds up: quarter notes, eighths, sixteenths, thirty-seconds;
- the chords repeat faster and louder, and go up an octave at the end; the bass moves to the octave;
- the last beat is silent (the drop), then everything lands back on the 1, with the cymbal.
Or choose where the drop lands: a click on a bar of the phrase line launches a rise up to that bar; the drop lands on its 1. The line colors the rise in red and writes DROP on the arrival bar.
The pad shows MONTÉE ▲ and how far along it is. With LIEN, linked instances rise together.
With LES DEUX, a CC setting can rise along with it: on the CC page, choose Montée as a card's GESTE (your synth's cutoff, for example). During the rise, it goes from its DÉBUT (start) to its FIN (end), following its COURBE (curve) (EXP (exponential) rises slowly, then fast); at the drop, it falls back all at once. The drums and the chords rise, the filter opens, and everything lands back together on the 1.
GESTE: your hand, replayed
GESTE is to the right of RAFALES, in the “how I play” bar.
- One click: from the next bar, it keeps your hand on the chords for 2 bars: where it goes, how hard it presses, when it lifts. The button shows REC and how far along it is.
- Then a ghost finger replays it, on a loop (you can see it on the pad). Your hands are free for Wiiiiiicked Audio or another instance.
- Put a new finger on the chords: you take back control, and the gesture stops. STOP stops it too.
- Right-click: keep 1, 2 or 4 bars, replay the kept gesture, clear it.
- The gesture is saved with the Set: when you reopen the Set, it's there, ready to go. Right-click, “Rejouer le geste gardé” (replay the kept gesture).
GRILLE (grid) keeps the chords; GESTE keeps everything your hand does, pressure included.
PILOTE: the autopilot
The PILOTE button, in the “how I play” bar, on the right (in poly and mono). Let go of the pad: PILOTE plays a chord progression that keeps coming back, like a song, one chord per bar, in the chosen mood.
The moods drawn at random: the progression starts from I and leans toward V at the end, and every 2 phrases a chord in the middle changes.
- POP turns around I, IV, V and vi; JAZZ chains ii-V-Is; MODAL stays put and brushes against its neighbors; SOMBRE (dark) leans toward VI and VII.
The written moods: a well-known progression, played in your key (in major or in minor, each has its own version). Every 2 phrases, a chord in the middle changes color (its 7th, its 9th), never its degree. The examples are in C major:
- DEEP: two alternating chords, Am9 and Dm9 (vi and ii; in minor, i and iv). The sway of deep house;
- ANDALOUSE (Andalusian): the descent Am, G, F, E (in minor, the V comes from the EMPRUNT (borrowed chord) row, as a major chord). Trance, cinematic, flamenco;
- NÉO-SOUL (neo-soul): Fmaj7, Em7, Dm7, Cmaj7, with 7ths and 9ths. Lo-fi, neo-soul;
- CINÉ (cinematic): C, A♭, B♭, C, the chords borrowed from minor. The epic sound of film scores and synthwave;
- PÉDALE (pedal): C, F, Am, F. Each chord keeps the tonic, which sounds all the way through; in mono, the line holds the tonic. Ambient, melodic techno;
- TOUR (round): the circle C, Am, Dm, G. Disco, soul, standards.
TA GRILLE (your grid): PILOTE picks up the last chords your finger chose (4, or the chosen length) and brings them to life: the same progression, with a chord that changes color now and then. Play your progression, let go of the pad: it carries on.
Choosing the mood again (even the same one) draws another progression. In the same menu:
- A progression of 2, 4 or 8 chords (LONGUEUR);
- Avec la MONTÉE (with the rise): during a MONTÉE, PILOTE speeds up (one chord per half bar), puts V just before the drop, then I right on the drop.
- Put your finger down: you take over; let go: it takes over again at the next bar. In poly, press as you take over: the pressure adds tension, the 7th, then the 9th, without moving your finger.
- One chord per bar, or every 2 bars: in the same menu.
- The PILOTE button shows the mood (PILOTE POP ▶). With LIEN, the bass and the drums follow.
RÉPONSE (response): the line that answers
In mono, in Séquence, RÉPONSE takes the place of VOIX (voices). It's for when this instance SUIT (follows) (LIEN):
- TROUS (gaps): the line only plays when the instance that MÈNE (leads) is silent. With a MÉLODIE (melody), it answers the chords in their silences.
- 2 MES (2 bars): the two share the phrase: the leading instance plays bars 1 and 2 of every 4, the line plays bars 3 and 4.
8. The axes and the pad presets
Just like in Wiiiiiicked Audio, every gesture can control any playing setting, finely, and your way of playing is saved in a preset.
The seven axes
Your hand (or your finger):
- X: from left to right; Y: from bottom to top. They sculpt when SCULPTER (sculpt) is on, or in the RYTHME (rhythm), SONS (sounds), HAUTEUR (pitch), ÉNERGIE (energy) and BANDES (bands) modes (with drums, X and Y are always the sequence area);
- Z: the pressure of the finger that plays (the pinch in front of the camera);
- W: the spread between two fingers on the pad (between your two hands in front of the camera).
Your second hand (or your second finger), with its own gestures:
- X2: from left to right; Y2: from bottom to top; Z2: its pinch (the pressure of the 2nd finger).
With the camera, the second hand is the one that shows up second; in Séquence (sequence), it's the left hand, in its third of the pad. On the trackpad, it's the second finger you put down. The seven axes work the same way with the camera, the trackpad and the mouse, in every mode and for every machine.
An axis with no setting does what it always did: pressure colors the chord or adds the accent, two fingers held down trigger RÉPÉTER (repeat), an engine's X and Y set its two settings, the left hand in Séquence picks the slot (Y2). As soon as you give an axis a setting, it only does what you ask it to. A second finger that controls X2, Y2 or Z2 no longer triggers RÉPÉTER.
AXES: the cards
AXES › (axes), in QUE FAIT MA MAIN (what my hand does) (in JEU (play) under the tiles, in ÉDITION (edit) at the end of their row), opens the cards in place of the right-hand panel, in three tabs: MAIN 1 (hand 1) (X, Y, Z, W), MAIN 2 (hand 2) (X2, Y2, Z2) and MODUL. (mod) (the modulations). The title says which pad mode they belong to (“AXES · RYTHME”): each mode has its own. The pad stays playable while you set things up: you hear it right away.
- + UN RÉGLAGE (+ a setting): choose what the axis controls. One axis can control up to four at once;
- the bar: the empty circle is the value at the start of the axis (finger on the left, at the bottom, light pressure, fingers close together), the full circle is the value at the end. Drag either one; a double-click flips the direction;
- the white dot shows where you are right now;
- LIN · EXP · LOG (linear · exponential · logarithmic): the curve (EXP slow at first, LOG fast at first);
- RETOUR · TIENT (return · holds): when you lift, the setting goes back to its value, or keeps the last one;
- the setting's name ▾: change it, invert it or remove it.
What the axes can control:
- everywhere: VÉLOCITÉ (velocity), SWING, FEEL, RAFALES (bursts);
- mono and poly: note DURÉE (length), ÉTENDUE (range) (1 to 3 octaves, in SAUTS (jumps), or in ESCALIER (staircase) if ÉTENDUE says so), OCTAVE (the base octave, from 1 to 4);
- poly: COULEUR (color) (none, add9, sus2, sus4), VOIX (voices) (2 to 8);
- everywhere as well: MUTATION (tab 3 HAUTEUR);
- mono: ÉVOLUTION (evolution) (MÉLODIE (melody), and the randomness of TURING (Turing machine)), BOUCLE (loop) (2 to 16 notes), SLIDES, ACCENTS;
- drums: DENSITÉ (density);
- the engines (section 7): COUPS (hits) and ROTATION (EUCLIDE (Euclid)), CHAOS (DÉS (dice)), HAUTEUR (height) and REBOND (bounce) (GRAVITÉ (gravity));
- the arpeggio and the strum (poly): SENS ARP (arp direction), OCTAVES ARP (arp octaves), VITESSE ARP (arp speed), CHANCE ARP (arp chance), RÉPÉTER ARP (arp repeat), ACCENT ARP (arp accent), STRUM (its speed), COURBE STRUM (strum curve), DÉCRESCENDO, CORDES (strings);
- your machine's CCs: at the bottom of the list, CC · machine name › gives you its settings by name (the cutoff, the resonance…), and Un autre CC (another CC) gives you all the others. You choose the machine at the top of the AXES cards (machine name ▾), the same one as on the CC page; a CC controlled by an axis goes from the start to the end of its bar, goes back to the start when you lift (or stays, with TIENT), and is only sent once you make your first gesture.
The axes are saved with the Set, for drums, mono and poly, and for each pad mode.
SCULPTER
SCULPTER (the LIBRE (free) tile, or at the top of the AXES cards): the pad no longer picks the notes, it sculpts. X and Y control their settings, and so do Z and W. The notes come from somewhere else:
- your MIDI keyboard: your left hand plays the chords, your right hand sculpts on the trackpad;
- HOLD in Jouer (play): the held chord keeps going;
- the sequence that's running, PILOTE (autopilot) (the chords chained by themselves), GRILLE (grid) (the ones you kept) or SUITE (next) (your scenes chained together) in Séquence.
The pad shows it: the area goes darker, X and Y say what they control, a cross follows your finger and a ring grows with the pressure. If you turn it on while X and Y are free, SCULPTER sets them up for you: in poly, note length and color (an arpeggio: its speed and its octaves; a strum: its speed and the length); in mono, the mutation and the octaves. With the camera, with two hands, SCULPTER gives X and Y to the right hand, on every page. On an engine's page, free X and Y set the engine, like the right hand in front of the camera.
Modulations
Just like the Mod tab in Wiiiiiicked Audio: settings that move by themselves, without you touching the pad. In AXES, the MODULATIONS page (in purple):
- LFO 1 and LFO 2: two waves locked to Live's tempo, with the same value at the same point in the song. Their shape: SINUS (sine), TRIANGLE, CARRÉ (square), RAMPE (ramp) (it rises, like a build-up over the phrase), PALIERS (steps) (a random value each cycle), HASARD (random) (the same, but gliding). Their length: from 1/16 to 16 MES (16 bars);
- APPUI (pressure): rises as long as you hold the pad (or as long as your right hand is there, with the camera), over 1 beat, 2 beats, 1, 2 or 4 bars, and falls back when you lift;
- VITESSE (speed): the speed of your finger or your hand; a quick gesture pushes it up, and it falls back within a few tenths of a second.
The little slider to the right of each source shows where it's at.
Four modulations below, each one a source and the setting it moves (the same ones the axes can control: swing, length, octave, mutation, slides, accents, bursts, density, color, the arpeggio, the strum… and your machine's CCs: an LFO on the TD-3's cutoff, for example, swinging around the middle):
- + UNE MODULATION (+ a modulation): the source, then the setting;
- the bar: how much, to the right for up, to the left for down. An LFO goes both ways around the value; APPUI and VITESSE push it in the direction of the bar. A double-click flips it;
- the cream dot: what the modulation is adding right now.
A modulation starts from the setting's value, or from the value its axis gives it when an axis controls it. Two modulations on the same setting add up. In the RYTHME, SONS and HAUTEUR tabs, a purple ~ at the end of a name tells you a modulation is moving it, and clicking the name also offers “le moduler par” (modulate it with) LFO 1, LFO 2, APPUI or VITESSE.
Some ideas:
- LFO 1, RAMPE over 4 MES → MUTATION: the line wanders further and further as the phrase goes on, then starts over;
- APPUI → RAFALES: hold your hand there, and the drums roll more and more;
- LFO 1, CARRÉ over 2 MES → OCTAVE, at +34%: one bar an octave up, the next one an octave down;
- VITESSE → ACCENTS: a sharp gesture accents the acid line.
Modulations are saved with the Set and in your presets: one setup for drums, one for mono, one for poly.
Presets: global, loops, pad
The preset menu (the name ▾, in the “how I play” bar) holds three kinds of presets, all stored in the plug-in and available in all your Sets:
- GLOBAUX : tout le plug-in (global: the whole plug-in): the whole instance under one name (the profiles, section 13);
-
BOUCLES (loops):
- Garder la séquence qui joue (keep the sequence that's playing): its settings and, if it's one of yours (MES (“my” sequences), ANNEAUX (rings)), its slot;
- Garder le GESTE (keep the gesture): your recorded hand;
- Garder ce que je viens de jouer (keep what I just played): the last bars you played (one or two), written as a sequence of your own;
- your loops, under their names. When you recall one: a sequence comes back with its settings and its slot; a GESTE replays from the next bar; what you played lands in MES, in the chosen slot, and plays. ⌘Z undoes it;
-
the folder:
~/Library/Audio/Presets/Wiiiiiicked MIDI/Boucles;
- PRESETS DU PAD (pad presets): your way of playing, see below.
The pad presets
In the “how I play” bar, at the top: ‹ name ▾ › and ENREGISTRER (save).
- ‹ › moves to the previous or next preset of the same type, even while it's playing;
- the name opens the menu: the BATTERIE (drums), MONO and POLY presets, the factory ones first, then MES PRESETS (my presets). Picking one of another type changes the type;
- ENREGISTRER saves your way of playing under a name: the type, the mode, the style or the engine, the sequence settings, SCULPTER, the mode's axes and the modulations. A name that's already taken gets replaced;
-
Ouvrir le dossier des presets (open the presets folder) (
~/Library/Audio/Presets/Wiiiiiicked MIDI/Presets): to copy them or share them.
A preset never touches the key, the scale, the octave or the kit: those stay the song's and the machine's. Anything a preset doesn't specify goes back to its starting value. A pad preset is a way of playing in NOTE mode: it switches back to NOTE mode, without touching the other modes' settings.
The 27 factory presets, nine per type (the last one of each type shows off the modulations):
- drums: Techno qui se tend (techno that tightens), Breakbeat, Hip-hop qui traîne (laid-back hip-hop), Euclide polymétrique (polymetric Euclid), Dés en folie (dice gone wild), Gravité (gravity), Garage qui chaloupe (swaying garage), Reggaeton, Techno qui respire (breathing techno) (the density breathes over 4 bars, holding your hand down makes it roll);
- mono: Acid qui monte (rising acid), Basse qui marche (walking bass), Basse dub (dub bass), Octaves disco (disco octaves), Mélodie qui mute (mutating melody), Turing, Basse jouée (played bass), Euclide en notes (Euclid in notes), Acid qui ondule (rippling acid) (the slides come and go, the mutation rises over 4 bars, a sharp gesture adds accents);
- poly: House qui respire (breathing house), Strum de guitare (guitar strum), Arpège qui grimpe (climbing arpeggio), Accords sculptés (sculpted chords), Jazz feutré (mellow jazz), Pad ambient (ambient pad), Euclide en accords (Euclid in chords), Gravité douce (gentle gravity), Arpège qui respire (breathing arpeggio) (the arpeggio climbs as long as you hold, its speed ripples, a touch of color now and then).
The preset remembers your way of playing, the scene remembers a moment in the song, and the profile remembers the whole instance for one machine (section 13).
9. The three layers: RYTHME, SONS, HAUTEUR
Every mode is set up the same way, in three layers, in the right-hand panel. At the top, always, what's playing: the chord (the note, the groove) in big letters, and where it comes from. Below, three tabs, in the layers' colors: turquoise for RYTHME (rhythm), sky blue for SONS (sounds), lime green for HAUTEUR (pitch) (the same colors as the pad modes; the X, Y, Z, W axes keep their orange, pink, red and amber).
1 RYTHME, when it plays. The playing mode creates the sequence.
- On the library, its versions, FAVORIS (favorites) and MES (“my” sequences): STYLE, RYTHME, SWING, FEEL, PHRASE, VARIANTE (variation), and the steps of the sequence.
- RYTHME picks the rhythm from the library separately from the way the notes are played. SÉQ (sequence): the rhythm that goes with the way of playing (as before). Otherwise, one from another family, played your way: an arpeggio on the block-chord rhythm, a strum on the bass rhythm; in mono, a line on the rhythm of an acid line or of an arpeggio (the line keeps its notes, one by one on the hits). The column then shows the names of that family's sequences, and the “what's playing” line, at the top of the panel, shows the mix: “ARPÈGE SUR RYTHME PLAQUÉ” (arpeggio on block-chord rhythm).
- On an engine (EUCLIDE (Euclid), DÉS (dice), TURING (Turing machine), GRAVITÉ (gravity), ANNEAUX (rings): the sequences that invent themselves as they play, section 7): its drawing and its settings.
- In Jouer (play), the rhythm is your finger.
2 SONS, what each hit plays, and how many notes.
- Poly: SONS · VOIX (notes · voices) (3 or 4 notes, and how many your synth plays at once), JEU (play) (PLAQUÉ (block chords), STRUM, ARPÈGE (arpeggio)) and their settings, DURÉE (length), COULEUR (color) (in JOUER, add9, sus2 or sus4 without pressing, and pressure adds more; in SÉQUENCE (sequence), chords that get more and more colorful and full, as if you were pressing; for the arpeggio and the strum, in their own screen).
- Mono: LIGNE (line) (bass, octaves, walking, acid, melody), SLIDES and ACCENTS (in the middle, ÉCRIT (written): the line's own; to the left, fewer and fewer; to the right, more and more), DURÉE; in MÉLODIE (melody), ÉVOLUTION (evolution) and BOUCLE (loop); the little bar drawing at the bottom opens the LIGNE screen.
- Drums: KIT and ÉLÉMENT (element).
3 HAUTEUR, where the notes land.
- The little keyboard and the range the pad reaches, then OCTAVE ◂ OCT 2 ▸, the base octave (clicking its name hands it to an axis);
- 1 OCT · SAUTS · ESCALIER · HASARD (1 oct · jumps · staircase · random), the range, or the CHANCES of each octave;
- MUTATION: the chance that a note changes, with a new draw every bar. A line: one or two scale degrees further. An arpeggio: another note of the chord. A block or strummed chord: another inversion. Drums: a hit that moves by one step (earlier or later), goes silent, plays softly or doubles.
◂ OCT ▸, at the top left of the pad, changes the base octave; clicking OCT opens the HAUTEUR tab (in SCÈNE (scene), which has no panel, its card).
The names of the settings tell you what controls them. A colored dot at the end of the name shows the axis that holds it (X, Y, Z, W, X2, Y2, Z2). Clicking the name: “le piloter par” (control it with) one of the seven axes, or stop controlling it. No more hunting for the target in the AXES (axes) cards.
10. The pad modes: the note, or a layer
With the camera or with the trackpad, your gestures do the same thing. The pad mode says what:
| Mode | What X, Y and pressure do (poly, by default) |
|---|---|
| NOTE | the pad plays the note, as always (with or without SCULPTER (sculpt)) |
| RYTHME (rhythm) | X the swing, Y the feel, pressure the bursts; on an engine, its two settings (COUPS (hits) and ROTATION, CHAOS, ALÉA (randomness), HAUTEUR (height) and REBOND (bounce)) |
| SONS (sounds) | X the voices, Y the length, pressure the color; on an arpeggio, its speed, its octaves, its chance; on a strum, its speed, the length, the decrescendo |
| HAUTEUR (pitch) | X the range (1 to 3 octaves), Y the base octave, pressure the mutation |
| ÉNERGIE (energy) | X brings everything up together, from calm to dense (bursts, voices, length, range), Y the octave, pressure the color |
| BANDES (bands) | the pad in three bands: rhythm at the bottom, notes in the middle, pitch at the top. The band under your hand picks the layer, X (and pressure) set it; each band keeps what you set in it |
In mono, SONS sets the slides, the accents and the length; with drums, RYTHME sets the density and the swing, SONS the velocity, HAUTEUR the mutation.
In the RYTHME, SONS, HAUTEUR, ÉNERGIE and BANDES modes, the chord keeps going: the one that was playing, or the one from your MIDI keyboard, from GRILLE (grid) or from PILOTE (autopilot) (the chords that play by themselves). X and Y keep their value when you lift your hand, like a knob you've turned; pressure springs back. What one mode has set stays when you move to another: the swing you set in RYTHME holds while you adjust SONS, then HAUTEUR. To hand the setting back to you, move it by hand (or recall a scene): the axis lets go of it until you touch it again. The modulations (LFO, APPUI (pressure), VITESSE (speed)) are shared by all the modes.
You change each mode's settings with AXES › (axes), in QUE FAIT MA MAIN (what my hand does). The cards are those of the mode that's playing; put whatever you like on them, on the seven axes. On an axis that has several settings, the one for what's playing comes before the others: on EUCLIDE (Euclid), X sets COUPS and leaves the swing alone; on an arpeggio, X sets its speed and leaves the voices alone.
The hybrid modes
- NOTE + LAYER, with two hands: the 2 MAINS (2 hands) switch in QUE FAIT MA MAIN (“la 1re main joue la note, la 2e règle la couche” (the 1st hand plays the note, the 2nd sets the layer)). Your right hand, or your first finger, plays the note as in NOTE; your left hand, or your second finger, sets the mode's layer with its X, Y and pinch.
- GESTE + LAYER: record your hand on the chords with GESTE (gesture) in NOTE mode, then switch to RYTHME, SONS or HAUTEUR: the ghost finger keeps playing the notes while your hands set the layer.
- ÉNERGIE: a single gesture builds up a whole track.
- BANDES: three layers under one hand.
Switching modes while you play
- the QUE FAIT MA MAIN tiles: at the top right in JEU (play), in a row in ÉDITION (edit) and above the pad in SCÈNE (scene). LIBRE (free) is NOTE with SCULPTER; clicking NOTE turns it off. 2 MAINS gives the note to your 1st hand (in the layer modes);
- QUE FAIT MA MAIN ▾ (its title, or a right-click on the tiles): the same choices in a menu, plus the mode options;
- the 1 to 6 keys on the computer keyboard, with the Wiiiiiicked MIDI window active (on a French keyboard, the top row: & é " ' ( §, with or without Shift);
- the Mode du pad (pad mode) parameter, to assign to a controller in Live (⌘M);
- with the camera: your second hand shows 1, 2, 3 or 4 fingers (the index; the index and middle finger; three; four, with the thumb folded), held still for a little over half a second: NOTE, RYTHME, SONS, HAUTEUR. ÉNERGIE and BANDES have no gesture (the open palm already does STOP): use keys 5 and 6, or the mouse. The requested mode shows up with a bar that fills; move or change fingers to cancel it. The mode that's already playing doesn't show up: an index finger pointed in NOTE still picks its slot. The camera menu, or QUE FAIT MA MAIN ▾, turns this off;
- on the trackpad: three fingers tapped together move to the next mode (NOTE → RYTHME → SONS → HAUTEUR → NOTE). This gesture is off by default, because macOS uses three fingers too: turn it on in QUE FAIT MA MAIN ▾ (“Le trackpad : trois doigts tapés” (trackpad: three-finger tap)).
The name of the mode shows up in big letters on the pad for a moment.
Seeing what you're setting
At the foot of the pad, over the video, the axes bar is always there, in all three views (with the camera in Séquence (sequence), at the foot of the chord area, on the right). It shows the mode, then what each of your gestures does, on one line: X, Y, Z, W, their setting, its value right now and where your hand is. A gesture with no setting says what it does on its own: LE DEGRÉ (the degree), LE REGISTRE (the register), LA COULEUR (the color), RÉPÉTER (repeat). A second line shows X2, Y2, Z2 as soon as your second hand is there, or as soon as they have a setting. FIGÉ (frozen) lights up on the right when things are frozen.
- In NOTE mode without SCULPTER, X and Y choose the chord: the bar says LE DEGRÉ and LE REGISTRE, even if they have a setting (it's waiting for SCULPTER).
- With 2 MAINS (“la 1re main joue la note”), X, Y and Z play the note; the layer's settings move to X2, Y2, Z2, those of your second hand. The sentence under the tiles says so too.
- In CC, the bar shows the patch's gestures and their values. In LES DEUX (both), an extra CC line shows what your second finger is setting.
FIGER
You've found a two-handed sequence you like and you want to touch it up with the mouse: FIGER (freeze), at the end of the “how I play” bar, the F key, or the FIGER parameter on a controller.
- What your hands, the trackpad or the mouse have set keeps going just as it is: the chord, the sequence, the value of each axis. You can take your hands away; the camera and the trackpad don't change anything anymore.
- You make your adjustments with the mouse. A setting controlled by an axis, once moved with the mouse, stays with the mouse as long as things are frozen.
- A second press hands control back: with the camera, whatever your hands are still holding picks up from where they are; on the trackpad, what was playing stops, and the finger still on the pad (the one that clicked FIGER) only plays once you lift it and put it back down.
A Set never opens frozen.
11. Writing your sequences (the MES page)
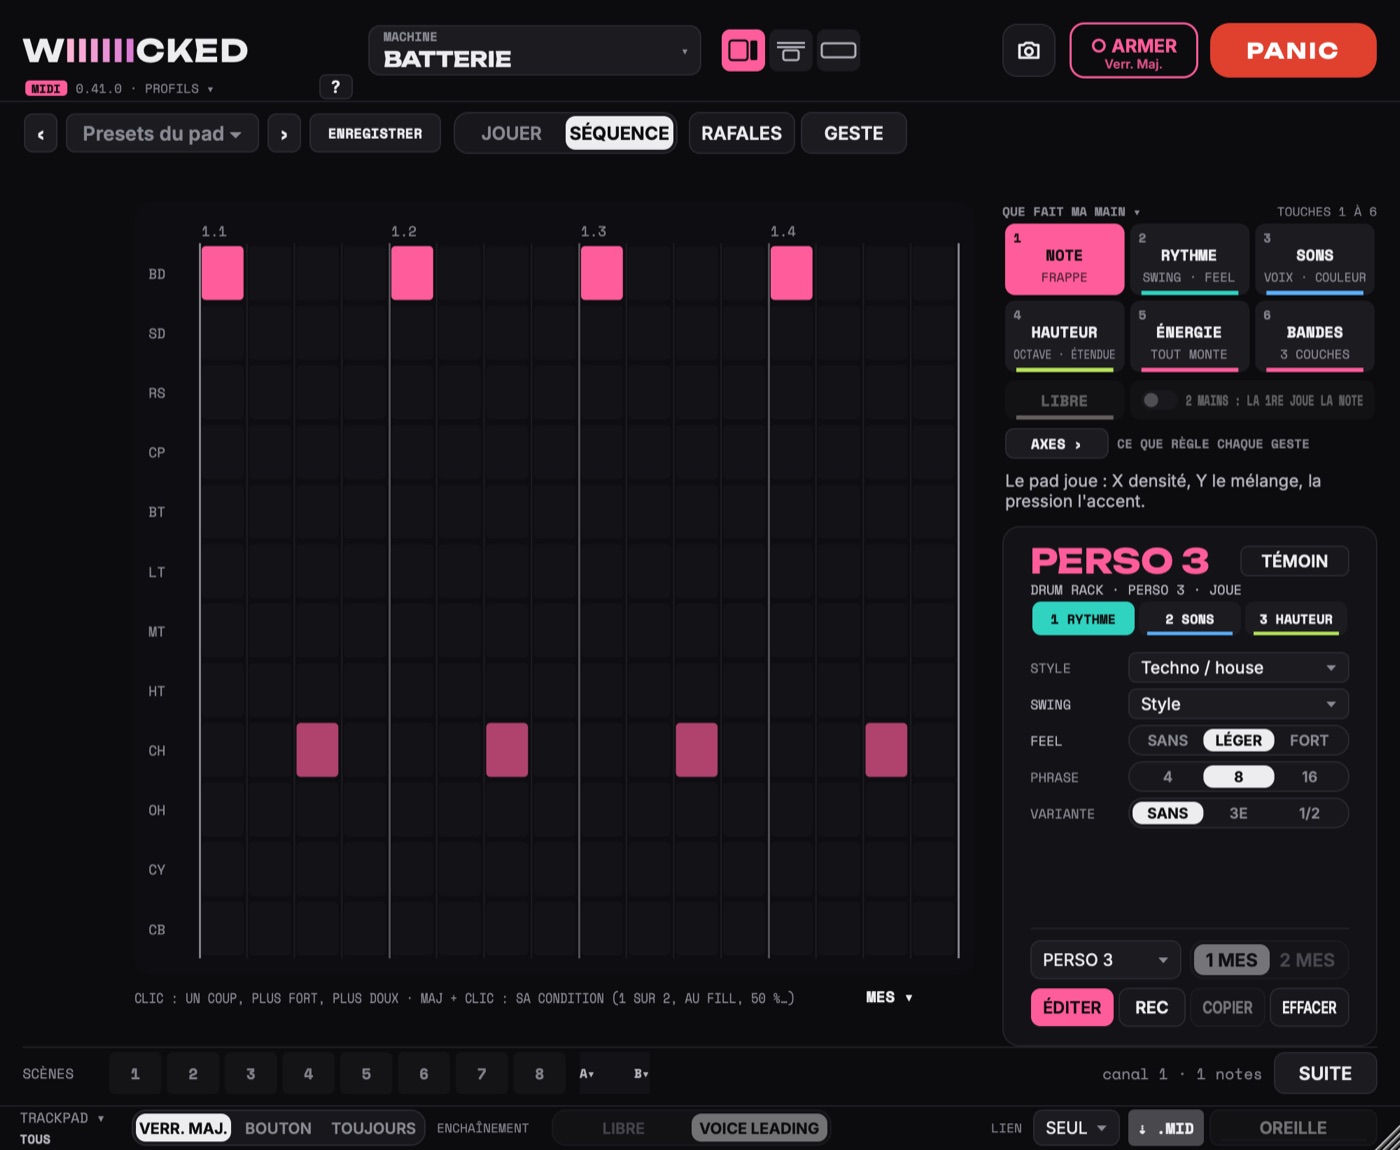
At the bottom of the right-hand panel (in ÉDITION (edit), or in JEU (play) on the MES (“my” sequences) page):
- the PERSO 1 to PERSO 8 (custom 1 to 8) menu: the sequence of your own you're working on. There are eight per type (drums, mono, poly);
- 1 MES · 2 MES (1 bar · 2 bars): its length, one or two bars, for the type that's playing (drums: always one bar);
-
ÉDITER (edit) replaces the pad with the step grid:
- in poly, clicking a step cycles through: hit, accent, soft, ghost note, nothing (four strengths);
- in mono, each row is a note of the chord that's playing, named in plain letters on the left (on I in C: C2, G2, C3, E3…), from the root an octave below up to the octave above. When the chord changes, the names follow: the line is written on the chord, not on a fixed note. A click cycles through: the note, its accent, soft, its slide, nothing;
- with drums, one row per element; a click cycles through the strengths: normal, accent, soft, ghost, nothing;
- a right-click holds the note up to that step;
- Shift + click gives the step a condition, as on Elektron machines (see below). Clicking ÉDITER again brings the pad back.
- REC records what you play in JOUER (play), from the next bar, over one or two bars. Live must be running. From Séquence (sequence), REC switches back to Jouer by itself. A second click stops it. The recording goes into the chosen PERSO sequence, and the grid opens so you can touch it up.
- COPIER (copy) takes the sequence chosen in the column (library or version) and puts it into yours, so you can touch it up.
- EFFACER (clear) empties the sequence (one hit stays on the 1) so you can write it from scratch.
Step conditions
In ÉDITER, Shift + click on a step opens the list of its conditions. The step then only plays when its condition is true; the condition is written on the step in the grid:
- TOUJOURS (always): the step plays every time (that's the default);
- 1 SUR 2 (1 of 2) (“1:2”) and 2 SUR 2 (2 of 2) (“2:2”): one loop out of two, the first or the second;
- 1 SUR 4 (1 of 4) (“1:4”) and 4 SUR 4 (4 of 4) (“4:4”): one loop out of four, the first or the last;
- AU FILL (on the fill) (“F”): only on a bar that kicks things off again (the 4th of each group of 4, as on the phrase line); HORS FILL (outside the fills) (“!F”): on all the others;
- 50 % (“%”): half the time, at random;
- 1RE FOIS (1st time) (“1re”): only the first loop, at the start or when the slot changes; PAS LA 1RE (not the 1st) (“!1re”): all the others.
A loop is the whole sequence: one bar, or two in 2 MES. Example: the kick on the 1 set to 1 SUR 2, a clap on AU FILL, a hi-hat on 50 %: a one-bar groove that breathes over four. Conditions are saved with the Set; EFFACER removes them.
The MES page in the column plays your sequences. The style keeps control of the swing, the feel and the way of playing (block chords, strum or arpeggio). Everything is saved with the Set.
12. MIDI CC: shaping your synths' sound
The CC page
With CC alone (“seuls” (on their own) on the MACHINE ▾ card), the whole pad becomes a surface: X, Y, pressure, and two fingers (their spread, their rotation) modulate up to 8 parameters of the synth. You set up the CC page in the ÉDITION (edit) view; in the JEU (play) view, the PATCH : … · ÉDITER › (patch: … · edit ›) button, at the top right, shows the patch that's playing and opens its page in one click. Scenes work in CC too. At the top:
- MACHINE: your synth or your drum machine (section 19), not to be confused with the MACHINE ▾ card in the header. Its parameters and its ready-made patches come with it;
- PATCH: the machine's ready-made patches, then yours (“Mien · …” (mine · …));
- NOM (name) and ENREGISTRER (save): stores the patch among your patches for this machine, under that name (a name that's already taken gets replaced);
- ENVOI (send): LENT (slow) (60 ms), MOYEN (medium) (25 ms) or RAPIDE (fast) (8 ms), how often values are sent during the gesture. Slow is for a machine that can't keep up with a dense stream, like the Sub 37.
The right-hand panel shows the values being sent, the CÂBLE MIDI (MIDI cable) meter, and, under SUR LA MACHINE (on the machine), what you need to set on the machine so that it receives.
Both hands in CC. Every machine has a ready-made Deux mains (two hands) patch: its first patch, plus your second hand (X2, Y2, pinch) on three more of its parameters. With the camera, your image is behind the CC page, and the axes bar, at the foot of the pad, says what each gesture sets.
The 8 settings
The 8 cards under the menus are the patch's settings. Click a card to set it:
- GESTE (gesture): X, Y, Pression (pressure), Écart (spread), Rotation, Montée (rise) (in LES DEUX (both): the setting opens up during a MONTÉE and falls back at the drop, section 7), or your second hand's gestures: X2, Y2 and Pincement 2 (pinch 2);
- PARAMÈTRE (parameter): one of the machine's parameters, from its list; “— (réglage éteint)” (setting off) turns the card off;
- CC: the number, typed by hand (0 to 127, PB for pitch bend, empty to turn it off). Any CC, even one that's not in the list;
- LEARN: turn a knob on the synth, and its CC goes into this setting. The synth's MIDI must reach the Wiiiiiicked MIDI track;
- TEST: plays the setting's range in slow steps (start, quarter, middle, three quarters, end, back), without you touching the pad. You hear right away whether the synth responds;
- 14 BITS: finer, for CCs 0 to 31, but twice as much MIDI. Leave it off if the synth can't keep up;
- DÉBUT (start) and FIN (end): the range. The start is the resting value; if the end is lower, the gesture works backwards;
- COURBE (curve): LIN (linear), EXP (exponential) (slow at first) or LOG (logarithmic) (fast at first);
- AU LEVER (on lift): when you lift your finger, it goes back to DÉBUT, to MILIEU (middle) (for a pitch bend or a ± setting), or the value TIENT (holds).
Pressure goes from a finger resting on the pad to a firm press, without going as far as the trackpad's click. The CCs follow fast gestures quickly and smooth out small ones.
LES DEUX
In LES DEUX (MACHINE ▾ card, “Avec les notes” (with the notes)), the notes play just as they do without CC, and the CC patch chosen on the CC page shapes the sound at the same time. The “what's playing” line, above the pad, reminds you of it (“CC :” and the name of the patch):
- the pressure of the finger that plays drives the “Pression” settings;
- a second finger drives X, Y, the spread and the rotation.
That's how a single instance can play a sequence on the Pro-800 while your pressure opens its filter.
The CÂBLE MIDI meter
A 5-pin MIDI cable can't carry much. Eight CCs in 14 bits could choke it and delay the notes. Wiiiiiicked MIDI sends the notes first; the CCs wait their turn when the meter reaches 90%. If it stays high: fewer settings, a slower ENVOI, or 14 BITS off.
13. Several tracks together
LIEN: one pad for several machines
LIEN (link), at the bottom right:
- SEUL (alone): the instance plays for itself;
- MÈNE (leads): it hands out its key, its chord, its chord changes (at the same moment), its start, its stop, its sequence, its BREAK and its scenes;
- SUIT (follows): it takes them. The bass and the drums follow the poly: a single pad for three machines. A BREAK on the leader makes the whole group break on the same beat, and a scene recalled on the leader recalls, in each instance that follows, its scene with the same number.
A leader in JOUER (play) makes the others follow the chords it plays. The counter, under the pad, says “MÈNE · canal 1 · n notes” (leads · channel 1 · n notes), “SUIT D majeur” (follows D major), or “SUIT : aucune instance ne mène” (follows: no instance is leading). Only one instance should lead.
Drums on several tracks
With ÉLÉMENT (element), one instance per element (the kick on one track, the snare on another…). With LIEN = SUIT, they all start together.
Profiles
Clicking the logo opens PROFILS (profiles):
- Enregistrer le profil… (save the profile…): the whole instance under one name (type, kit, style, settings, CC patch, your sequences, your scenes);
- the list of your profiles: one click recalls one, in any Set;
-
Ouvrir le dossier des profils (open the profiles folder) (
~/Library/Audio/Presets/Wiiiiiicked MIDI/Profils).
The profile's name shows up under the logo. For example, a “TD-3 bass” profile and a “Rytm techno” one, to start a Set in two clicks.
14. With Wiiiiiicked Audio
These features need Wiiiiiicked Audio in the same Set: the two plug-ins share a small memory, inside Live.
AUDIO: the tuned effects
AUDIO (under the scenes): Wiiiiiicked Audio tunes itself to the chord this instance is playing.
- Its Résonateur (resonator) takes the notes of the chord (its Note knob keeps the register);
- its Peigne (comb) takes the closest one;
- its pitch picks intervals that fall within the chord (the third becomes major or minor).
The button tells you how many Wiiiiiicked Audio effects are singing the chord (AUDIO · 2). At 0, it fades: the audio plug-in's pad has no Résonateur, no Peigne and no pitch; choose a pad from the Live · Accordés (tuned to the key) category. In the audio plug-in, a pink ACCORDÉ · Am7 (tuned · Am7) badge lights up above the pad.
The MONTÉE (rise) reaches the audio plug-in too: when it's set to Auto › Montée avec le MIDI (rise with the MIDI), Wiiiiiicked Audio rises with every MONTÉE of this instance (its dot travels from the bottom-left corner to the top-right corner) and lifts at the drop.
Only one MIDI instance at a time should have AUDIO on. With drums, AUDIO doesn't show up.
OREILLE: the key it hears
While the Wiiiiiicked MIDI window is open, Wiiiiiicked Audio listens to its own track and guesses the key. OREILLE (ear) shows it (“A mineur” (A minor), with “?” when it's unsure), and the bar below says how sure it is.
- A click takes it as the TONALITÉ (key) and GAMME (scale) (major or minor).
-
Right-click:
- Suivre l'oreille (follow the ear): the key changes by itself once it has been sure for 2 seconds. The button then has a ring around it;
- Écoute courte (short listening) (the last 2 seconds, reacts fast) or Écoute longue (long listening) (the last 6, more reliable).
Linked scenes
Right-click a scene › Rappeler aussi la scène de même numéro (also recall the scene with the same number) in Wiiiiiicked Audio: recalling scene 3 in the MIDI plug-in also recalls scene 3 in Wiiiiiicked Audio. The audio plug-in is told the moment the MIDI scene arrives (at the end of the bar, of 2 bars or of the phrase): with its “Sur la mesure” (on the bar) transition, both land on the same 1.
The shared trackpad
With Caps Lock (on screen: VERR. MAJ.), the last window you clicked (audio or MIDI) plays on the trackpad, and the others wait (section 2). To play the audio and the MIDI with the same finger, set one of the two to TOUJOURS (always) or BOUTON (button). To play them each on its own trackpad, at the same time: the audio on the Mac's trackpad (in its Réglages (Settings)), the MIDI on the Magic Trackpad (TRACKPAD ▾, section 2).
15. Scenes, .MID and ANNULER
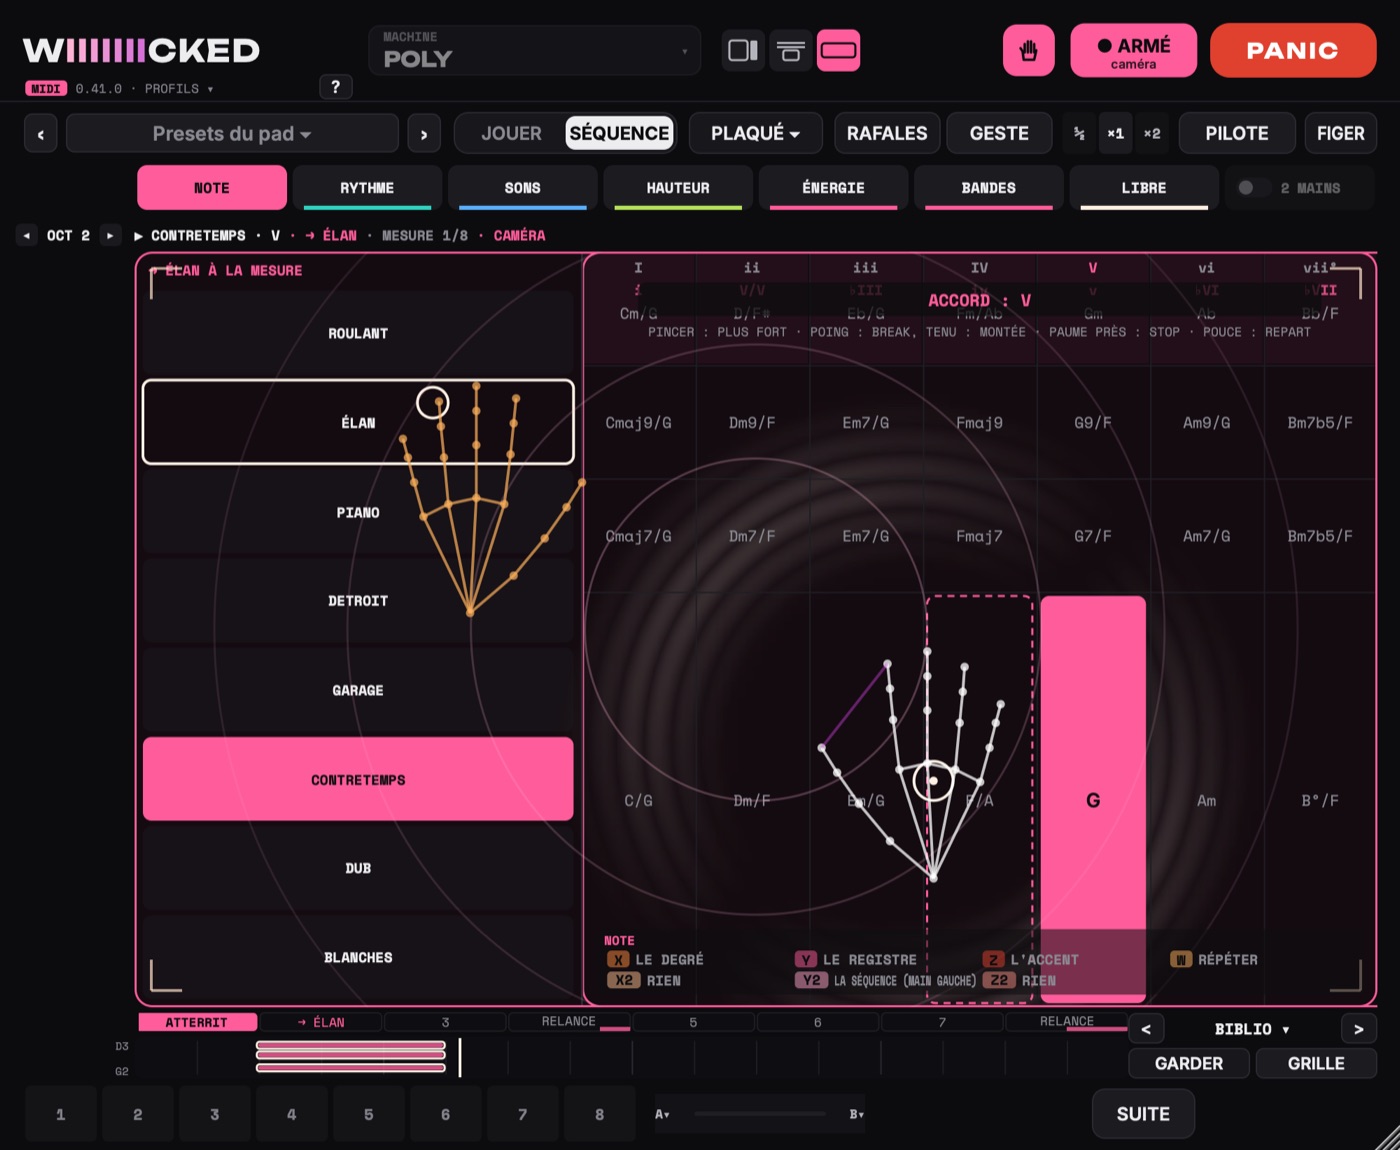
The 8 scenes
Under the pad, after SCÈNES (scenes) (in the SCÈNE (scene) view, big, at the very bottom):
- clicking an empty slot saves your settings and your sequence: ÉTENDUE (range) and ½ ×2 included, the arpeggio and the strum (chance, repeat, accent, steps, curve, decrescendo, strings), the color, the voices, RAFALES (bursts) and PILOTE (autopilot) (section 7), and the position of your machine's CCs. The pad mode, though, doesn't change with a scene;
- when you recall it, your machine's CCs also go back to where the scene had them;
- clicking a full slot recalls them. With Live stopped, right away; when a sequence is playing, at the end of the bar (or of 2 bars, or of the phrase, your choice: right-click), so that the new sequence starts on the next bar;
- Shift + click saves the scene, even on a full slot;
- right-click: “Garder ici les réglages et la séquence” (keep the settings and the sequence here), “Rappeler” (recall), “Effacer” (clear), “Nommer…” (name…), quand une scène arrive (when a scene arrives) while it's playing (at the end of the bar, at the end of 2 bars, at the end of the phrase: a scene that always lands at the start of a phrase) and the link with the audio plug-in's scenes.
A scene's bubble shows its name. Scenes come back with the Set and with profiles. For a performance: one scene per part of the song, which you chain one after another. The Scène 1 to Scène 8 (scene 1 to 8) parameters can be assigned to your controller's pads (Live's Map mode), just as in the audio plug-in.
The A ↔ B fader
Like the scene crossfader in Wiiiiiicked Audio. It's always there, right after the 8 scenes: as long as it doesn't have its two scenes, it shrinks down to A▾ B▾; clicking A▾ or B▾ picks the scene for that side (or right-click a scene › “Le fader : en A” (the fader: on A), then “en B” (on B)). It then stretches out into an A ━━●━━ B fader (a small A and a small B mark the two slots).
- Drag it: the settings that vary glide from A to B (velocity, mutation, octaves, chances…), the choices (style, page, pattern, mode, the arpeggio's steps) flip over halfway along (on the first move: those of the side it's on), and B's sequence starts on the next bar. A choice you change by hand in the meantime stays as long as the fader doesn't cross the middle again. Your machine's CCs glide too, from the value they had when you saved A to B's value, until your hand takes the setting back;
- double-click: all A, or all B;
- nothing moves as long as the fader doesn't move: you can adjust something else in the meantime;
- the Scènes : fader A → B (scenes: fader A → B) parameter can be assigned to a controller, and an axis can control it (FADER A→B, in the list of settings): your second hand slides the song from one scene to the other.
SUITE: chaining the scenes
The SUITE (next) button, at the end of the row of scenes, builds a whole song:
- Ajouter une scène à la fin (add a scene at the end) (one by one: 1 → 2 → 3 → 2), or Toutes mes scènes, dans l'ordre (all my scenes, in order);
- Une scène par phrase (one scene per phrase), or every 2 or 4 phrases;
- En boucle (on a loop), or une fois (once) (it stops on the last scene);
- ▶ Lancer la suite (start the chain): the 1st scene starts, then the next one comes in on the last eighth note of the phrase, so it starts with the next phrase.
While it plays, the button and the line above the pad show SUITE 2/4. You can still recall a scene by hand. The chain comes back with the Set, stopped.
.MID: dragging what you just played
- Drag the .MID button onto a MIDI track in Live: the last bars you played become a clip.
-
A click saves them in
Music/Wiiiiiicked MIDI. - Right-click: how many bars (1, 2, 4, 8 by default, or 16), and Avec les CC et le pitch bend (with the CCs and the pitch bend) or Les notes seules (the notes only).
ANNULER (undo) and RÉTABLIR (restore)
⌘Z undoes, ⇧⌘Z redoes, in the Wiiiiiicked MIDI window. The PROFILS ▾ (profiles) menu tells you what will be undone (“Annuler : la scène 3” (undo: scene 3)). This covers your PERSO (custom) sequences, the CC patch and the scenes, and also, across the whole instance (settings included), a pad preset, the axes, a profile and a loop, up to 40 steps back. The history stays when you close the window. If Live grabs ⌘Z for itself, use the menu.
16. The camera
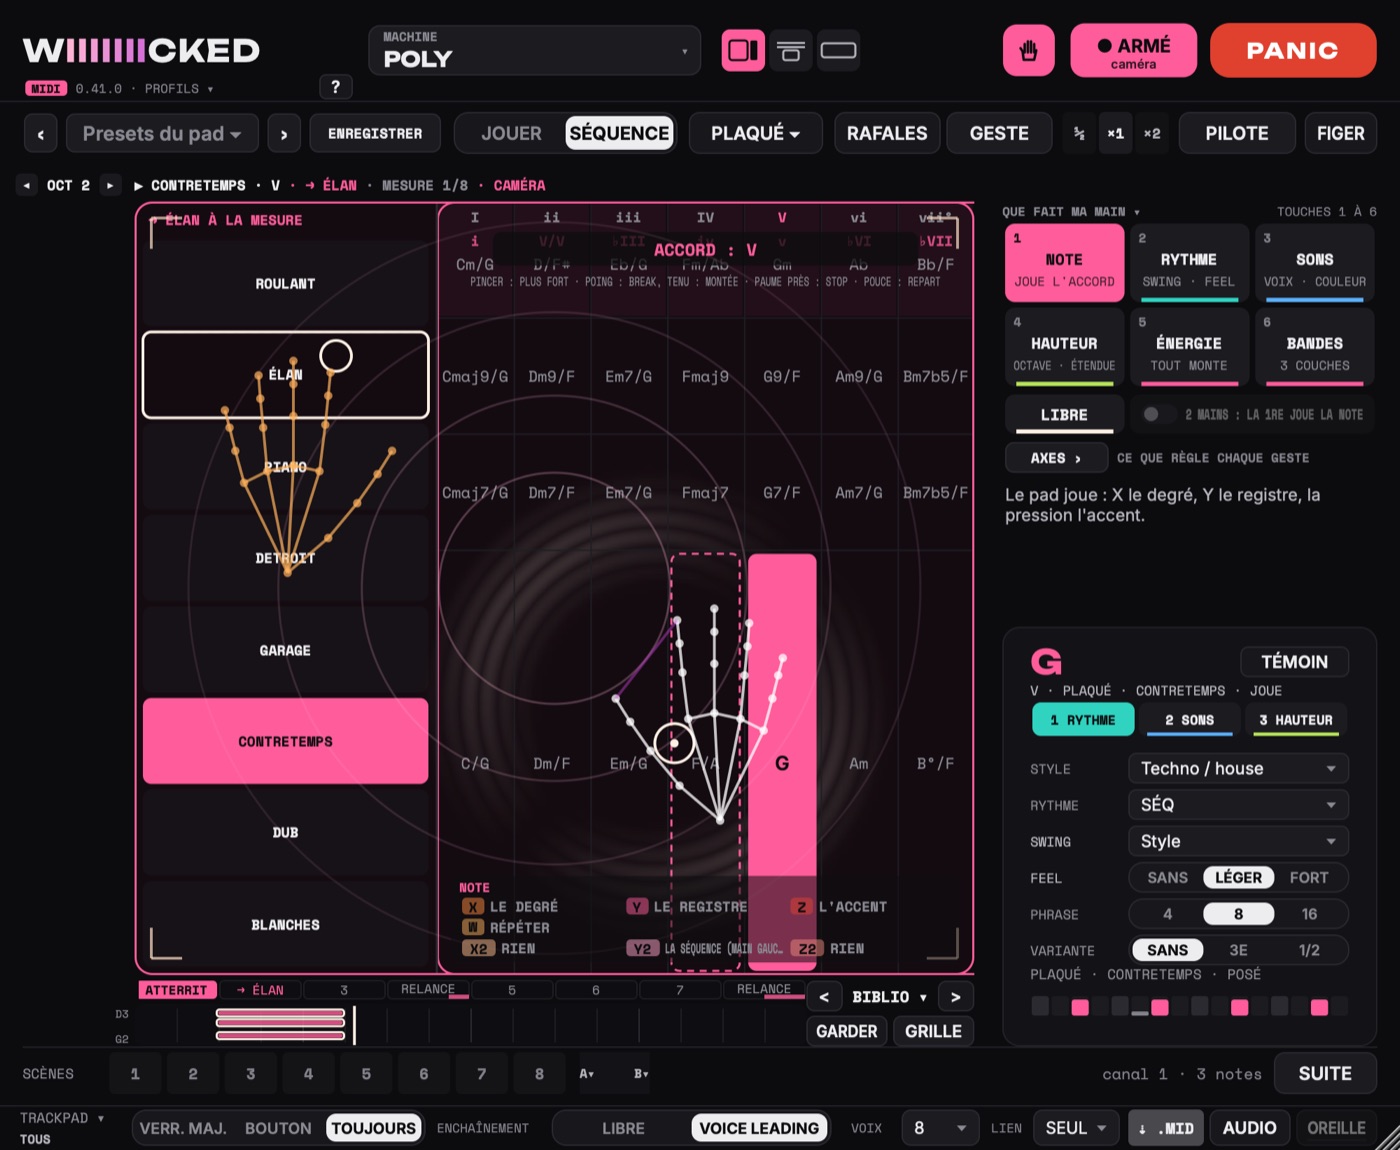
The Caméra (camera) icon, at the top, opens its menu:
- Caméra éteinte (camera off);
- Les mains jouent (the hands play): your palm plays wherever it appears on the pad; pinching makes the pressure; a second hand makes the spread and the rotation, like two fingers, and has its own X2, Y2 and pinch (section 8);
- Le visage joue (the face plays): your head places the finger, your open mouth makes the pressure.
The camera plays as soon as it's on: no need for Caps Lock (on screen: VERR. MAJ.), which is only for the trackpad. Under ARMÉ (armed), the button shows caméra. The one exception: in BOUTON (button), click ARMER (arm). Every window that has its camera on plays from it, even if another window was clicked after it. The trackpad takes a rest in the meantime. It works without CC, with the notes, or with CC on their own: your image is behind the pad in all three cases.
At the bottom of the menu: Le poing fait BREAK (the fist does BREAK) and La 2e main montre 1 à 4 doigts (the 2nd hand shows 1 to 4 fingers) (the modes), which you can turn off if you don't want them.
The image, as in Wiiiiiicked Audio
The camera image fills the pad, with the same treatment as in the audio plug-in: a contrasty black and white, tinted with Wiiiiiicked MIDI's pink just as the audio plug-in's is tinted with its orange. It's cut to the shape of the pad: your hand plays exactly where you see it, in all three views. When it's not armed (in BOUTON, with ARMER off), the pad darkens it, as in the audio plug-in.
Your hands, as in the audio plug-in, drawn on top: a white skeleton (the bones and the joints), the second hand in W's color, and a line between your thumb and index finger that gets thicker when you pinch. Subtle rings and four corner brackets remind you that the corners of the image are the corners of the pad. Your face, in face mode: the corners of its frame and the lips.
The music plays on the image, just as the audio plug-in's effects play on its own image:
- each note: a flash of light, as strong as the note;
- a chord change: ripples spreading out from your hand;
- an accent: the colors shifting;
- the slides (or the LIÉES (tied) notes): the image leaves a trail, like an echo;
- an LFO running: the pink breathing toward purple;
- the MONTÉE (rise): bands that slide, more and more, and the light rising;
- BREAK: a flash, then the image in big blocks.
Hands in Séquence: nothing to aim at, just gestures
In Séquence (sequence) (without CC), with Les mains jouent, the pad splits in two, one area per hand. The pad tells you what each hand does: as long as it doesn't see a hand, each side shows its instructions (MAIN GAUCHE (left hand), MAIN DROITE (right hand), the gestures); as soon as a hand is there, what it sets is written in big letters with its value (“COUPS 44 % · ROTATION 30 %” (hits 44% · rotation 30%), “DENSITÉ 60 %” (density 60%), “ACCORD : IV” (chord: IV)), and the requested slot is announced at the top left (“→ BOSSA À LA MESURE” (→ BOSSA at the next bar)). Under the pad, just as without the camera, the phrase line and the bar as it sounds show what your hands are doing to what's playing.
- On the left, the slot. The 8 slots of the page, stacked one on top of the other, from calm (at the bottom) to full (at the top). Move your hand up or down: the slot under it gets a ring around it and plays on the next bar.
- On the right, the playing, as on the trackpad. In NOTE mode, the hand plays what a finger would play there: the density with drums, the chords in mono and poly, on every page. In RYTHME (rhythm) mode (2 fingers of the left hand, or the 2 key), it sets the engine (section 7): COUPS and ROTATION for EUCLIDE (Euclid), CHAOS for DÉS (dice), ALÉA (randomness) for TURING (Turing machine), REBOND (bounce) and HAUTEUR (height) for GRAVITÉ (gravity). With drums, on an engine, it always sets the engine's settings (DÉS and TURING also have the density). The panel follows along, with the little X and Y.
- The chords, when your hand is setting a layer, come from somewhere else: from GRILLE (grid) (the chords you kept), from PILOTE (autopilot) (chained by themselves), or from a MIDI keyboard (one white key per degree). Or else keep the note in your right hand and set the layer with your left: 2 MAINS (2 hands) (“la 1re main joue la note” (the 1st hand plays the note)). The chord that's playing shows at the top right of the pad.
-
The gestures, with either hand:
- the fist, clenched tight and held still for half a second: BREAK. A bar fills first (“BREAK ?”): open your hand to cancel it. A hand that curls up while playing, or that pinches, no longer sets it off. Hold it one more second: the MONTÉE, all the way to the end of the 4 bars, then the drop on the 1;
- 1 to 4 fingers of the left hand, held still: the pad mode (NOTE, RYTHME, SONS (sounds), HAUTEUR (pitch));
- the open palm, very close to the camera, for one second: STOP. A bar fills, and you can pull your hand away before it's done;
- thumbs up: it starts again.
The gesture it sees shows up in big letters in the middle of the pad. The mouse keeps the column (slots, BREAK, STOP), even while your hands are playing. To change page, pick it from the list of pages: it plays right away.
A second hand no longer triggers RÉPÉTER (repeat) in Séquence: it has its own area. In Jouer (play), and with CCs (on their own or with the notes), nothing changes: the palm is the finger, and a second hand makes the spread and the rotation.
Keep the camera on in only one of the two plug-ins at a time, Wiiiiiicked Audio or Wiiiiiicked MIDI.
17. A MIDI keyboard
A keyboard plugged into the Wiiiiiicked MIDI track (track armed, or Monitor on In) plays the pad:
- the note you play is read in the song's key: in D major, D plays I, G plays IV; in D minor, F plays III;
- a note outside the scale plays the degree just below it with its 7th (in Séquence (sequence), the 7E (7th) row), or the one above when there isn't one below;
- in Jouer (play), the keyboard's octave, counted from the tonic, picks the row of the pad (the tonic in octave 2 is the lowest);
- a key struck hard (112 and up) makes the accent;
- the last key held is the one that plays; letting go of the last one is like lifting your finger.
The keyboard doesn't play drums.
18. The window
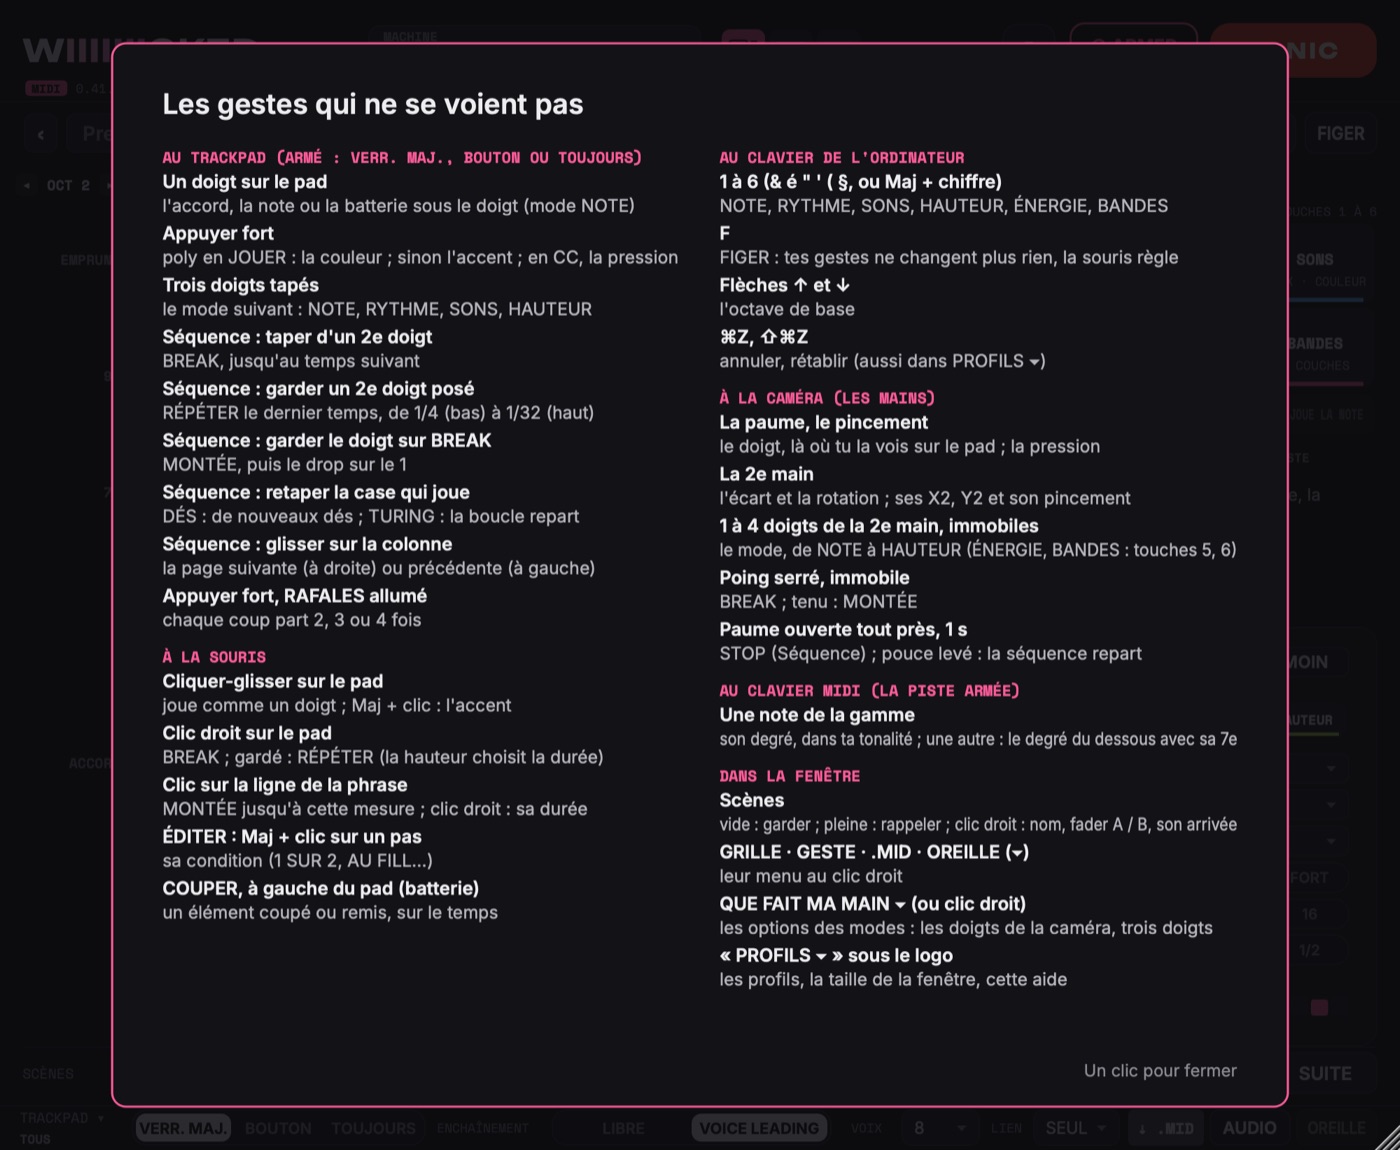
- The views (the three little drawings at the top, to the right of the MACHINE card): JEU (play) for playing (the pad big), ÉDITION (edit) for setting everything up, SCÈNE (scene) for the stage (the pad across the full width). The view is saved with the Set.
- Size: from 70 to 160%, by the bottom-right corner, or through PROFILS ▾ (profiles) › Taille de la fenêtre (window size). It's saved with the Set.
- ? (at the end of the line under the logo) or PROFILS ▾ › Les gestes cachés… (the hidden gestures…): the “Les gestes qui ne se voient pas” (the gestures you can't see) overlay. One click closes it.
- The PROFILS ▾ menu brings together the profiles, the size, the help, Annuler (undo) and Rétablir (restore).
19. Your machines
The MACHINE menu on the CC page holds 15 machines, with 45 ready-made patches. The SUR LA MACHINE (on the machine) panel reminds you what to set on each one.
| Machine | What to set on the machine | Ready-made patches |
|---|---|---|
| Moog Subsequent 37 | MIDI › IN CHANNEL and IN PORTS; close the Moog editor. Keep 7 bits and a slow ENVOI (send) | Le filtre qui respire, Multidrive et feedback, Vibrato et battement, LFO 2 sur le filtre, Ondes et bruit |
| Arturia MiniFreak | Utility › MIDI › Input Channel and MIDI From; close MiniFreak V, which blocks incoming CCs | Les deux macros, Le filtre qui respire, Timbre et forme, Effets en jeu |
| Behringer TD-3-MO | The channel in SynthTribe. Only one sound CC, the cutoff (CC 74), which adds to the CUTOFF knob: set the knob halfway. The accent and the decay have no CC | Coupure au doigt, Coupure à la pression, Coupure et bend |
| Elektron Digitone · piste | RECEIVE CC/NRPN = ON; the track's channel in the External Instrument | Le filtre qui respire, FM qui grogne, Désaccord et mix, Base et drive |
| Elektron Digitone · FX | The FX channel in the External Instrument; the tracks must send to the effects | Delay en jeu, Espace |
| Elektron Analog Rytm · piste | RECEIVE CC/NRPN = ON; the track's channel (1 to 12) | Le filtre, La caisse qui chante, Machine et sample |
| Elektron Analog Rytm · performance | The PERF channel; the kit must have macros | Quatre macros |
| Elektron Analog Rytm · FX | The FX channel; the tracks send to delay and reverb | Delay en jeu, Espace et écrasement |
| Elektron Analog Four · piste | RECEIVE CC/NRPN = ON; the track's channel (1 to 4) | Le filtre ladder, Sync qui hurle, Deux filtres, Vibrato et forme d'onde |
| Elektron Analog Four · performance | The PERF channel | Quatre macros |
| Behringer Pro-800 | SETTINGS: “MIDI CC” on Rx, and the channel | Le filtre qui respire, Poly-Mod, Largeurs d'impulsion, Vibrato et LFO |
| Behringer Kobol Expander | Receives no CC: its patches go through pitch bend (its range is set in SynthTribe) | Bend vers le haut, Vibrato au doigt, Bend en tournant |
| Behringer Pro-VS Mini | FUNC + 1: “MIDI CC” = on, and the channel. Most settings go from 0 to 99 | Le filtre qui respire, Ondes qui tournent, Effet en jeu, Voix désaccordées |
| Behringer JT-4000 Micro | SETTINGS › MID B: the channel; the balance and the filter envelope need the late-2023 update | Le filtre qui respire, Supersaw qui s'ouvre, LFO et anneau, Enveloppe du filtre |
| Autre synthé (CC standard) | The most common CCs: check your synth's CC chart, or use LEARN | Le filtre standard |
An Elektron's channels are separate “machines”: an instance sends on a single channel, the one set in its External Instrument. To modulate track 1 and the effects of a Digitone, you need two instances.
Your patches are stored in ~/Library/Audio/Presets/Wiiiiiicked MIDI CC, one folder per machine.
20. The 18 styles
Each style has 8 sequences per pattern (block chords, strum, arpeggio; bass, octaves, walking, acid, melody) and 8 drum grooves, from the calmest to the fullest. It also has its own swing, its own feel and its own chords. The tempo stays Live's: the one in the table is a suggestion.
| Style | Suggested tempo | What gives it away |
|---|---|---|
| Techno / house | 124 | four on the floor, chords on the offbeats, hi-hats pushed ahead |
| Acid | 128 | 303 lines with slides and accents |
| Hip-hop / lo-fi | 88 | late snare, heavy swing |
| Ambient / cinématique | 80 | long notes, flowing playing |
| Reggae | 75 | one drop, skank on the offbeats, shuffle |
| Dub | 70 | heavy bass, silences, note echoes |
| Electro | 125 | syncopated 808, arpeggiated bass |
| Rock | 120 | backbeat on 2 and 4, chords in fifths |
| Bossa nova | 130 | syncopated guitar, root-fifth bass, rimshot, jazz chords |
| Samba | 100 | surdo on the 2, partido alto, tamborim |
| Funk | 105 | sixteenth notes, ghost notes, slap bass |
| Disco | 120 | four on the floor, open hi-hat, octave bass |
| Drum & bass | 172 | breakbeat over two beats, long bass |
| Afrobeat | 110 | interlocking patterns, rolling bass |
| UK garage | 132 | 2-step, skipped kicks, strong swing |
| Reggaeton | 95 | dembow 3 + 3 + 2 |
| Synthwave | 105 | '80s snare, eighth-note arpeggios |
| Jazz | 140 | swing ride, walking, Charleston comping, rootless chords |
21. Controlling from Live
The main settings are Live parameters: you can automate them, or assign them to your controller in Map mode (⌘M). For example: Tonalité (key), Gamme (scale), Accords (chords), Octave, Vélocité (velocity), Armer (arm), PANIC, Type, Mode, Style, Motif (pattern), Motif mono (mono pattern), Swing, Hold, Voix (voices), Kit, Élément (element), Phrase, Changement d'accord (chord change), Feel, Break, Durée des notes (note length), Variante (variation), Page de séquences (sequence page), Famille (family), Lien (link), Mutation, Boucle de la mélodie (melody loop), Accorder Wiiiiiicked Audio (tune Wiiiiiicked Audio).
And also: FIGER (freeze), Mode du pad (pad mode), La 1re main joue la note (the 1st hand plays the note), Scènes : fader A → B (scenes: fader A → B).
Type and Famille are the two choices on the MACHINE ▾ card (BATTERIE (drums) · MONO · POLY, and its CCs); Mode is JOUER (play) · SÉQUENCE (sequence); La 1re main joue la note is the 2 MAINS (2 hands) tile.
The most useful ones on a controller: PANIC, Break, Page de séquences, Style, FIGER and the fader A → B.
Everything else (your sequences, your favorites, the CC patch, the scenes, the grid, the window size, the TRACKPAD setting) is saved with the Set.
22. Troubleshooting
-
Nothing reaches the synth.
- Does the “canal 1 · n notes” (channel 1 · n notes) counter, under the pad, go up when you play? If not, the pad isn't armed (see ARMER (arm)) or another window has the trackpad.
- Turn on TÉMOIN (test sound): if you hear the little sound, the plug-in is playing, and the problem is the routing.
- On the synth's track: MIDI From = the Wiiiiiicked MIDI track, second menu Wiiiiiicked MIDI, Monitor on In.
- For a hardware machine: the output and the channel of the External Instrument.
- The trackpad doesn't play, and ARMER says “autre fenêtre” (other window). Another Wiiiiiicked window has the trackpad: click in this one, or give it a trackpad of its own (TRACKPAD ▾).
- A trackpad doesn't play this window. Look under TRACKPAD ▾: if only one is chosen (DU MAC (the Mac's), MAGIC), the other one is for another window; Tous les trackpads (all trackpads) gives them all back.
- A note is stuck. PANIC. Stopping Live also cuts everything.
- I hear the notes twice. TÉMOIN is on while a synth is already receiving: turn it off.
- The sequence doesn't start. In Séquence (sequence), touch a chord on the left: that's what starts the sequence. STOP stops it.
-
The CCs do nothing.
- Read SUR LA MACHINE (on the machine): the machine must receive CCs (Rx, RECEIVE CC/NRPN, MIDI CC = on), on the right channel.
- Try TEST on a setting, without touching the pad.
- Sub 37: Moog editor closed, 7 bits, slow ENVOI (send). MiniFreak: MiniFreak V closed. TD-3-MO: CUTOFF halfway. Kobol: pitch bend only.
- The CÂBLE MIDI (MIDI cable) meter stays high. Fewer settings, a slower ENVOI, 14 BITS off.
- Two instances are fighting over the chords. Only one should be on MÈNE (leads).
- OREILLE (ear) stays gray. The Wiiiiiicked MIDI window must be open, and Wiiiiiicked Audio must be playing on a track that makes sound.
- AUDIO doesn't change the sound. The Wiiiiiicked Audio preset must use the Résonateur (resonator), the Peigne (comb) or the pitch, and only one instance should have AUDIO on.
- ⌘Z does nothing. Click in the Wiiiiiicked MIDI window first, or go through PROFILS ▾ (profiles) › Annuler (undo).
- “Glisse ta licence ici” (drop your license here) on the pad. This is the beta: drop the license file in your name (.wlic), the same one as for Wiiiiiicked Audio, anywhere on the window, or choose it. Until then, Wiiiiiicked MIDI doesn't play, and whatever the track receives passes through unchanged.
- The arrow keys don't change the octave. Click in the Wiiiiiicked MIDI window first (not in a field or a list), or use ◂ OCT ▸ at the top left of the pad.